
by Izolda | Aug 8, 2017 | Giving Back
There is nothing more special than the feeling of getting involved in a project you are passionate about while knowing that you are actually making a difference in the lives of others. Here’s what John from the Hillcrest AIDS Centre Trust had to say about our visit.
Dear Tanya,
Thank you so much for coming through to Hillcrest AIDS Centre Trust yesterday for Mandela Day and for the engaging teaching and involvement you gave our nursery team. We learned so much and the information and techniques showed will really improve our methods and growing.
We look forward to receiving the written notes (via email) of what you shared yesterday as well as the other supplies you talked about. The shelving for Jabulani’s shed will also be a major help in our efficiency and stock keeping.
Once again, our heartfelt appreciation for all the expertise, time and energy you shared with our team yesterday! We look forward to having you pop by again. In the meantime we’ll be working hard to implement all you taught to improve our capacity and methods.
Warm regards,
John


by Izolda | Aug 4, 2017 | Events, Gardening
Our mission: to catch our breaths after the ten day East Coast House and Garden Show! Ashley, Izolda, Gerald and myself headed for Port Elizabeth, destination Graaff-Reinet. So off to The Eastern Cape we went – fitting in so much over the 4 days, including the gorgeous Valley of Desolation, Nieu- Bethesda with its famous Owl House, and a bookstore with the best second-hand gardening books I have seen in a long time. Needless to say, I left with an entire box of new treasures to enjoy.
No visit to Graaff-Reinet is complete without taking a walk through the amazing garden of extraordinary collector Johan from Obesa nursery. What an experience and an honor to spend some time with such a wise man whose plant breeding has created the most spectacular crosses of succulents – of course some of them just had to come home with me – two full boxes of new plants made it back safely on the aeroplane and are now planted, joining my hundreds of other plants in the ever growing collection of succulents.
We were privileged enough to also visit Johan’s son Anton who is also an avid collector. Not only does he have a magnificent collection but oh my goodness his garden is something else – plants that make your mouth gape with pure amazement, plants that I have only ever seen in books, and a real maze of succulents and cactus species – wow wow – please do treat yourself to a visit!


by Izolda | Jul 31, 2017 | DIY, Gardening
Trending: Recycling or upcycling anything to give new life to old things is still ‘in’.
Use old wheelbarrows, boots, leaking buckets or discarded kitchenware as containers for herbs or succulents. Remember: If it’s hollow and can hold soil, it can be a container. But be careful not to dot them around too haphazardly or your garden or patio will begin to resemble a junk yard! Take time to display everything you’ve planted and grown together in an artistic way to please the eyes and other senses.
Repair and paint old trellis frameworks or burglar proofing panels and use them as a framework for small vertical gardens against a wall to grow herbs, or fix them horizontally as hanging places for light-weight hanging baskets or very fashionable kokedama.

by Izolda | Jul 31, 2017 | Gardening, Pruning
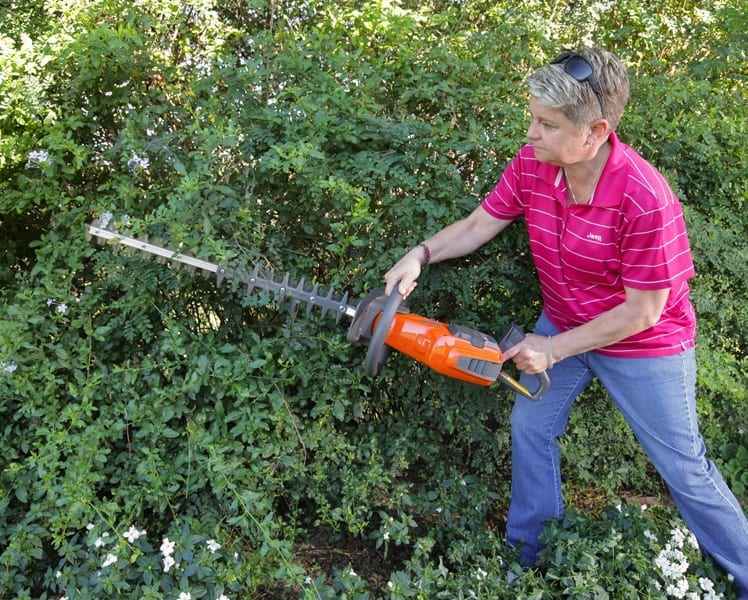
Get Pruning! Spring is around the corner, which means that now is the time to trim your hedges.
There are a few basic steps to stick to when trimming a hedge:
- Ideally, trim hedges regularly, a little bit at a time – the less you remove at once the healthier it is for the plants.
- Shape hedges so that the bottom is slightly wider than the top, so that sun is able to reach the bottom of the plants. This prevents bare patches and dead branches at the base.
- Start pruning on the sides of the hedges, which are easier to keep straight than the top.
- When trimming the top of the hedge, use builder’s line and pegs across the length of the hedge to keep your cuts straight – there’s nothing worse than a wavy hedge!
- Prune regularly every four to six weeks during the growing season, removing as little new growth as possible, while still maintaining the required shape and dimensions.
Before you get started, check that your pruning tools are disinfected, clean, sharp, and designed for the specific task at hand. This minimises damage and bruising to pruned stems. While standard hand shears will do the job, an electric or battery operated hedge trimmer takes the sweat out of it and produces a very neat hedge in no time at all.
Fertilising and care
To promote healthy green foliage, feed the hedge every six weeks during the growing season with a fertiliser blend that is high in nitrogen. Water during prolonged periods of little or no rainfall.
#TanyaSilentGarden


www.husqvarna.com


by Izolda | Jul 31, 2017 | Gardening, Pruning
Pruning, just like watering and feeding, is part and parcel of general plant care. It’s also easy, as long as you know why, when and how to do it.
Why prune?
1. To rejuvenate: Pruning encourages new, healthy growth, which naturally means more leaves, flowers and fruit.
2. To tame space eaters: Plants like bougainvilleas and other wild creepers need to be pruned to stop them from growing into gutters or over telephone and power cables.
3. For shape and damage control: Trees and large shrubs that have been damaged can be pruned to get them back into shape. Young trees need to be pruned regularly to maintain a straight main stem and to produce a neat crown, and the low side branches of overgrown shrubs can be cut away to allow space for other plants to be grown beneath them.
4. For pest and disease control: If there is a crisis situation of some sort, you can prune away dead and heavily infected growth – which should be burned or destroyed immediately. Opening up or decreasing the size of an affected plant makes it easier to treat the plant with a fungicide or insecticide, and betters the coverage of these control measures.
5. To allow in more light: Where a huge tree casts too much shade, corrective pruning by sawing off the lower branches and even removing some branches inside its canopy can be done. It is especially deciduous trees that are bare in winter and are pruned for this reason, as it is easy to see in which direction the branches have grown and which can be removed without damaging the natural shape or weakening the tree.
Is there a ‘main’ pruning season’?
Winter is deemed to be the main pruning season by many gardeners, but while it is the correct time for some plants, folks who simply cut back all their woody shrubs are doing their gardens a disservice. Winter is the correct time to prune certain plants that flower on new growth produced in spring and summer such as roses, but one must keep in mind that some flowering shrubs, like spiraeas, weigelas, hydrangeas, deutzias, philadelphus and viburnums, bloom on hardened wood from the previous growing season.
A year’s pruning in a nutshell
For practical reasons, we’ve divided a year’s pruning for popular garden plants into four quarters. Putting the job off for a month is not going to make a huge difference to most plants.
1st Quarter: January to March
- Evergreen trees – remove low side branches.
- Climbers – stop fast-growing climbers like Boston ivy (Parthenocissus tricuspidata) and ornamental vine (Vitis coignetiae) from clogging gutters.
- Pelargoniums – cut them back in early autumn and use the prunings for cuttings.
- Evergreen hedges and shrubs – prune them all for neatness and shape in late summer, except those expected to flower or produce berries in autumn or winter like plumbago, tecoma and firethorns.
- Fuchsias – cut back and use prunings to make cuttings.
2nd Quarter: April to June
- Summer-flowering shrubs, climbers and perennials like bougainvilleas, cannas, heliconias, Michaelmas daisies, obedience plants, salvias, penstemons, yarrow (achillea) and chrysanthemums can be cut back or pruned in April.
- Cut off dead palm fronds and remove summer-storm damaged branches from trees.
- Prune plectranthus firmly back after flowering.
- Cut back perennial summer herbs to dry the prunings for winter.
3rd Quarter: July to September
- Deciduous fruit trees, blueberries and grape vines must be pruned in July. After pruning spray the dormant plants with lime sulphur. Prune peach trees only when already in blossom.
- Variegated plants like coprosmas – remove any green growth that appears suddenly, or the whole plant will revert to green.
- Tea and floribunda roses can be pruned from the end of July and into August. Get rid of dead, weak, or sick side branches and those rubbing against each other or crossing in the centre of the plant. If the form of the plant looks fine to you (it should have an open cup shape), simply prune the left over branches to about knee high.
- Plants like poinsettias, plumbagos, tecomas, hypericums, heliotropes, solanums, canary creepers, golden showers and buddlejas can be pruned in September when they have stopped flowering.
- Ribbon bushes, wild dagga and Cape mayflower (only after flowering) must be cut back to ankle level to renew.
- Tidy up bamboos and nandinas by cutting out old stems and cleaning up at their bases.
- Conifers grow actively in cooler months and can be lightly pruned to shape them neatly. Never cut into old wood, rather just shave off healthy foliage and growing tips with sharp secateurs or a hedge clipper – this will result in fresh growth.
4th Quarter: October to December
- Frost-damaged parts must be removed to prevent a disease from getting a hold on weakened cells. This must only be done after all danger of late frost is over.
- Clip off spent flowers and growth tips on azaleas.
- Shape citrus trees by removing excess growth and misshapen branches.
- By now, evergreens like buxus, durantas and syzygiums will sport lots of new growth, which allows you to prune them into different topiary shapes.
- Prune shrubs and climbers like jasmines that have flowered in late winter and spring.
- Prune back the side branches of hibiscus and tibouchinas to encourage lots of flowers in late summer and autumn.
- Prune banksiae roses.
- November is a good month for pruning proteas, pincushions, and leucadendrons, by removing all the old flowering stems and generally neatening the plants. Other fynbos plants, like confetti bushes and honey euryops, can also be pruned back.

How to prune?
Never try to prune without a plan. If you keep to the basic steps below you will save a lot of unnecessary cutting
- Get rid of dead, broken and diseased branches by cutting them back to a strong lateral branch. Ideally, this will result in a dense tree or shrub being thinned out sufficiently and not needing any further pruning.
- Next, the remaining side branches can be shortened to 2-3 buds or eyes, from which new growth will sprout.
- Keep the plant’s natural growth habit in mind while pruning, and stand back every now and again to check your work.
- Suckers sprouting at ground level or against the rootstock of a standard rose or grafted plant must be removed immediately.
- Use pruning tools that are disinfected, clean, sharp and designed for the specific task at hand.
Tool up with pruning tools
Quality cutting tools make light work of pruning. Buy the best quality you can afford, keep them sharpened, cleaned with disinfectant, and oil them before storing them.
Pruning shears: Pruning shears are only used to cut off small twigs (2-3cm thick), prune roses, take slips and cut flowers. There are many kinds available at prices that vary from dirt-cheap to very expensive. You will enjoy a lifetime of pleasure with top-quality shears, and you may even be able to approach the dealer for new spares or to sharpen the blades.
Branch cutter: A branch cutter has long handles and short parrot-beak blades for pruning away tree and shrub side-branches, and also reaching thicker side-branches of roses from a safe distance.
Hedge clippers: Hedge clippers have long, straight blades and are useful for soft hedging and making topiaries.
Bow saw or tree saw: This is the ideal tool for sawing off smaller tree branches. Heavy branches should rather be removed by a trained tree surgeon.
Safety glasses: Small pieces of plant material and even insects can land in your eyes while pruning, especially if you are working above your head, making safety glasses an important part of your pruning arsenal.
Garden gloves: Use thick gloves to protect your hands from getting blisters or against thorns.


by Izolda | Jul 31, 2017 | Gardening, Grow Your Own, Herbs & Vegetables
There’s a month to go before spring, which means it’s time to prepare beds, wash seed trays, turn the compost and sow seed in trays for an early start.
The get ready for spring checklist:
Make your own germination mix
Make a 50/50 mix of sifted garden soil and fine compost. The finer the soil texture the better the contact between the seed and the sowing medium. If it is too coarse, air pockets form around the seed that traps water and the seeds rot.
10 minutes to spare
Wash and sterilise seed trays and pots. Use water and Jik or vinegar, with a little liquid soap.
Get beds ready
Diminishing yields, disease, compacted or heavy soils and poor drainage are indicators that the soil needs regenerating. Vegetables do best in fertile, friable soil that allows the roots to draw up oxygen and water, and the best way to achieve this is by double digging. Double digging aerates the soil to a depth of 60cm and incorporates compost, but doesn’t affect the soil life or displace the topsoil. It is only necessary to double dig beds every 4-5 years. In between, beds just need to be topped up with compost and topsoil, which is lightly forked in.
How to double dig
Water the bed well a day or two beforehand. This helps with measuring and marking out the beds using sticks and twine, and also helps with the digging. Dig the bed in sections, about 1m² at a time. Remove the top 30cm of soil of the first square and put it to one side. Loosen the second layer of soil to a depth of 30cm but do not remove the soil. Fork in the compost. One bucket of compost (10 litres) is used per 1m² for enriching both the topsoil and subsoil. Dig the next 1m² section, but put this topsoil, mixed with compost, into the first section. Keep turning the topsoil from one section into the previous section until you reach the end of the bed. At the end of the bed, you will take the topsoil from the first section and mix it into the last section. The result will be a bed that is about 15cm higher than the surrounding soil. Rake it level, removing clumps and stones. Water the bed and cover it with mulch. It is now ready for sowing or planting.
5 minutes to spare
Vegetable seed is generally viable for 2-3 years if stored correctly. Once a packet has been opened, fold over the top and secure it with a clothes peg and store it in a sealed container in a cool place.
Can’t wait to get going?
If the soil is still too cold for sowing in situ, sow in seed trays, cover them with cling wrap and keep them on a hot tray turned as low as it can go, or on a heating pad. This will warm up the soil enough for the seeds to germinate. Keep in a warm, sheltered place.
Garden task list:
- Feed winter veggies with a seaweed-based plant tonic. If applied as a drench it will also stimulate microorganisms in the soil.
- Harvest regularly. Removing the main broccoli head allows side shoots with smaller heads that can also be harvested.
- If rain has compacted the soil, lightly loosen it, being careful not to damage the roots.
- Water in the morning and increase watering as temperatures start to rise.
- Put down snail bait (Ferramol is organic) and control aphids with an organic insecticide.
by Alice Spenser-Higgs


by Izolda | Jul 31, 2017 | Gardening, Pruning, Tips
- Roses that weren’t pruned in July can still be pruned during the first week of August. In very cold areas, pruning only needs to be done at the end of August.
- Roses that were pruned in July will be sprouting, and corrective pruning can be done. See which eyes have sprouted strongly and cut back to them. Competing stems may also be easier to see and be cut out.
- Thrips was such a problem last season that the most important task is to drench newly sprouted roses with Koinor (2ml per litre), Confidor or Merit. These long-lasting insecticides protect against all sucking and chewing insects for about six months.
- Black spot or mildew shouldn’t be a problem, except in coastal KwaZulu-Natal where the growth of the roses is more advanced. Alternate Rose Protector with Ludwig’s Insect Spray, Chronos and Spray Stay
(our Cocktail 1).
- As temperatures warm up, increase watering to twice a week. A long, deep watering that soaks down to the roots is best.
- Roses that were not fertilised after pruning can be fertilised now with Vigorosa or the long-lasting Vigo-Longer, which is a controlled-release fertiliser that lasts the full season.
- Re-stake standard roses using a strong treated (not with bitumen) wooden pole or a suitable metal stake. Never use a thin wire or similar material as ties because this will chafe the stem or grow into the bark. Rather use strips of shade cloth.
Climbing Roses – A Special Case
Climbing roses require attention in August. To open up space for new growth, older branches can be removed and the remaining stems, from the previous season, tied to a support, as horizontally as possible. Tying stems horizontally activates all the eyes along the stem, which then produce shoots and flower. The result is many more flowers than if the stems are left to grow upright, which results in flowers only at the end of a stem.
Good to Know
- When tying stems to a support, don’t make the ties too tight because the stems get thicker during the season.
- Stems can also be tied to other stems, and not just to the supports.
- Once the main stems are tied in place, the side shoots on each stem can be reduced to about 10-20cm. By leaving a stub with 2-3 eyes, new growth will develop quickly and the best flowers will come from these shoots.
- Once the main framework of canes is in place, don’t be reluctant to cut away unnecessary stems or side shoots.
- Remove the leaves where possible.
Get the look
This garden is as pretty as a picture, the gardener having cleverly used roses to complement a mixed planting. Glowing ‘Salmon Sunsation’ and ‘White Sunsation’ roses are planted en masse among pink and white gaura with bold clumps of Margaret Roberts lavender and edged with a clipped hedge of golden Duranta ‘Sheena’s gold’. The urn, filled with pelargoniums, gaura and solanum in the same colour scheme, acts as the central focus. Other bedding roses that could be used to equal effect are ‘Tawny Profusion’, ‘Deloitte and Touche’, ‘Ice Sunsation’, ‘Granny’s Delight’, ‘Dawn Sunsation’ and ’Pink Profusion’.
by Ludwig Taschner

by Izolda | Jun 30, 2017 | Events
Each and every year, the School of Garden Design Charity Breakfast does an excellent job of bringing together like-minded people that want to see growth in nature as well as in human nature.
Thanks to The Gardener Magazine and this year’s sponsor, Mpact Recycling, we saw a good 300 people arriving at the Chantecler Hotel on Thursday morning, which is nothing short of picturesque and sets the perfect scene for an event that celebrates the beauty of life, and of course, a well-kept garden.
The beautifully dressed Hall was draped in white linen and fairy lights, all meeting in the middle as if to illuminate the wonderful idea of people coming together to make a difference, while songs like Doris Day’s ‘Dream a Little Dream for Me’ created an ambience like no other.
Aside from actually being greeted with a wonderful gift bag that included a range of special items to take home, from beauty products to vouchers, every which way I looked I was greeted by smiling faces or bursts of laughter, with some generally happy chatter quickly filling the very short gaps of silence.

One thing I have to make mention of, however, is how quiet the hall appeared to get when I got up to give my talk – there is nothing more wonderful than sharing your knowledge and experiences and truly knowing that there are so many people actually interested in listening. With each click of the slides, that showcased the many beautiful gardens that I have been lucky enough to visit around the world, came an echo of ooh’s and ah’s.
There were so many people involved in this fantastic initiative for The Sunflower Fund, and I am truly blessed to be able to say that I was a part of it. While I am upset that the event is now over, I am on to the next!
Find me at the East Coast Radio Home and Garden Show from the 30th of June to the 9th of July or take a look at where you can catch one of my upcoming talks here.

by Izolda | Jun 20, 2017 | Gardening, Gardening Trends & Inspiration
An inviting pathway that leads from one place to the next around a corner or simply to another part of the garden creates immediate interest making visitors want to see what’s on the other side along the way. Garden design is not complete without including pathways and this is evident mostly in formally designed gardens where in order to admire the beautifully formed geometric shapes there has to be some sort of access walkway.
All pathways must be inviting. In informal design curving paths meander around a garden from one garden room to the next, but they must have a decent curve not a wavy erratic line. Pathways should never also go nowhere. If there is no choice in the matter, make sure the end of the pathway like that against a wall or boundary has something of benefit like a bench, water feature, beautiful container, bird bath or statue – something to admire or to sit on and look back upon the garden.
Choosing the right path materials
There are several different materials that can be used to make a pathway – the only important thing to remember is that people are most likely going to walk on it so it should be wide enough and stable enough to do that. A pathway that has an equal width all the length of it will seem more natural than one that shifts in and out all the time. Informal garden pathways are the easiest as they can be as simple as a cleared area through shrubs and trees covered in leaves. Straw or hay is another inexpensive way to line pathways and it will keep the mud off your feet. Stones and gravel are good for pathways, but not so good on bare feet. These are especially not good for children to get to their play areas. Falling leaves may make keeping stones clear a nightmare, but they are perfect around the house as the noise they make is a great deterrent to burglars. In sunny areas, lovely grassy pathways are ideal, soft on your feet and easy to maintain with the rest of the lawn. This idea needs to be avoided though if there is plenty of foot traffic along the pathway as the tiny grass plants will not be able to keep up with constant abuse. Bark mulch is another great natural product, easy on the eye and creating an inviting pathway.
Hard landscaping materials like paving, bricks and cement are semi permanent features that need careful planning before installing as it would be costly and hard work to change the pathway once its been laid. Plants are an important addition to this feature and will make it appear more natural.
