
by Izolda | Apr 26, 2017 | Gardening
Freesias and Tulips
Breeding experiments turned two bulbous plants from different continents into the late-winter- and spring-flowering darlings of gardeners all over the world.
Freesias
The nose-pleasing blooms we’re able to plant today hale from a genus of 14-16 species of flowering plants in the family Iridaceae, all of which are native to Africa, and many from the Cape region. Freesias lay dormant during the hot, dry summers, are nurtured by the cooler weather and ample rains of autumn and winter, and then bloom fragrantly and beautifully in spring.
Freesias are beautiful additions to any garden, whether you cluster them in beds or create a colourful display in containers. They can also make gorgeous houseplants and are very popular commercial cut flowers. If you plant the bulbs at intervals, then successions of blooms will grace your garden, which is ideal for cutting.
Growth requirements
- Freesias are best planted from mid-April to May, and you will expect to see the stunning blooms from August to September.
- Freesias prefer slightly acidic, organic-rich soil with ample drainage.
- Freesias do not require excessive watering. A good rule of thumb is to leave the soil dry for a few days between each watering.
- Plant freesias in bold patches in sunny to partly sunny locations – they look delightful grown in masses in the garden. Expect to see spectacular white, red, lilac, yellow and pink, elegant, funnel-shaped blooms that begin to open the base and unfold upwards. The flowers appear among the foliage on long spikes.
Tulips

Tulips require ‘cold treatment’ or ‘forcing’ to grow and flower successfully in South African gardens, which is the reason why we have to order the bulbs either directly from a bulb supplier or a nursery that provides this service.
Spring-flowering bulbs like tulips are very hardy. In fact, they like the cold of winter. As soil temperatures cool, the bulbs begin root growth, which continues until temperatures become very cold. Then, just as temperatures begin to rise, shoot growth begins, followed by flowering. Forcing is simply deliberate manipulation of this cycle.
Commercial growers are able to artificially create the conditions necessary to convince tulip bulbs to flower from mid-winter in South Africa, and in early June they are released from their cold rooms for prompt delivery to eagerly awaiting gardeners. They must be planted straight away, as they have no shelf life at all.
Eight weeks after planting, provided they have been watered correctly, they will burst into flamboyant colour. Not only will flowers last much longer in late July and August than in our warm October weather, but treated bulbs grow more vigorously than the ordinary kind, and they produce larger flowers on much stronger stems. If you like, you can pop a few choice bulbs into pots when they arrive. Keep them in the garden in a semi-shaded position until they flower and then choose a light, airy position inside your home and enjoy them indoors as well.
Top tip from Hadeco
Don’t forget the ‘Three F’s’: Water your bulbs for Forty minutes, with a sprinkler, every Four days and don’t Forget.

by Izolda | Apr 26, 2017 | Gardening, Water Wise
Folks say that one should go the local route, and although it is true that there is no region in this country that does not have its own endemic plants, the question arises whether they are easy to find in a local nursery.
Here is a selection of plants for a medium-to-low watering zone, which can be called upon to be your garden’s guardian angels due to their resilience against heat, wind, pests and disease. You can plant them for their looks too.

1. Artemisia Afra repels insects like mosquitoes, flies and worms, and keeps dogs away if planted as a protective border. When pruning back is needed, use the cut-offs as an excellent, organic and insect-repellent mulch.

2. Tulbaghia Violacea, the pungent-smelling wild garlic, repels various insects, moles (and apparently even snakes!), and has pretty purple flowers in summer that attract pollinators. It is perfect as a gap filler or for mass planting as a border.

3. Tecoma Capensis ‘Pink Blush’ has beautiful soft, pink flowers on tall, glossy-leaved shrubs. It’s an excellent choice for a hedge, or interplanted with plumbago, and is loved by birds.

4. Salvia Chamelaeagnea ‘White’ is a tall, striking shrub with pure white plumes of flowers. It’s good for coastal conditions in full sun, requires little attention and is quite drought tolerant, but will thrive with regular watering and feeding. Interplant with S. Chamelaeagnea ‘Blue’ and cut both back hard in winter. Both are loved by butterflies.

5. Leonotis Ocymifolia has striking orange flower spikes on compact plants. Fast growing and very tough in harsh coastal conditions, it needs to be pruned hard after flowering. It is irresistible to sunbirds.

6. Plumbago Auriculata ‘White’ is hardy to coastal conditions, with lovely pure white flowers. It grows up to 1.5m tall and is a perfect hedging subject, as it is very drought tolerant and responsive to pruning.

7. Lobelia Valida is a perfect short-lived perennial for sun or light shade, with intense blue flowers. Although drought hardy, it responds well to regular watering, feeding and trimming to encourage more flowers.

by Izolda | Apr 26, 2017 | Gardening, Gardening Trends & Inspiration, Grow Your Own
Winter flowers aplenty from the food garden.
Alice Spenser-Higgs
If you are hooked on the pleasure of picking your own grown veggies and herbs, why not extend that to cut flowers that will fill your home with colour in winter? A cutting garden fits easily into a veggie garden because it needs the same conditions; plenty of sun, a level site, well-composted soil and good air circulation to prevent fungus disease but also some protection from draughts in winter. Likewise, beds can follow the same layout: rectangular with narrow pathways in between for ease of access and space to work.
Planning tips
- Plant the same variety of cut flower in a bed or section of a bed. It is space efficient and easier when it comes to cutting. Group varieties with the similar sun, water and drainage requirements in the same area.
- Annuals and perennials should be planted separately because annuals have a much shorter production period and will be changed seasonally. Allow space for successive crops of spring, summer, autumn and winter flowering annuals to be planted together.
- Plant tall flowers towards the back and smaller ones to the front so that the taller ones don’t shade the lower growers.
What makes a good cut flower?
They should be easy to grow, flower prolifically and produce sturdy or long, straight stems, says Marlaen Straathof of Kirchhoffs Seeds. “The stems need to be a good length but, “she adds, “they don’t have to be ultra-long because when I buy cut flowers the first thing I do is cut the stems to fit the vase and I am sure most people do too.”
One of her favourite winter cut flowers is pansies, which produce long enough stems to make a beautiful low table arrangement that doesn’t force people to peer at each other around them.
Also, choose varieties that last well in the vase, hold their flower shape and make a statement, with bold, large, colourful or well-formed blooms.
Winter cut flowers for the food garden
If the family’s taste doesn’t run to extensive plantings of cabbage, broccoli and kale, filling the beds with flowers will be a winner all round. It is another way of practising crop rotation too, by giving the soil a break before the next summer crop of tomatoes and other veggies is planted.

Climbing sweet peas (Lathyrus odoratus) are a great space saver and provide a heady perfume. Heirloom varieties have smaller flowers but a much stronger scent. Prepare the soil to a depth of 50cm (either a hole or trench) with lots of additional compost, well-rotted manure, and a handful of agricultural lime per square metre. Sprinkle iron chelate at the bottom of the hole and add superphosphate or bonemeal for root development. Set up the trellis before planting so that the plants tendrils can cling to it as they grow. When plants are about 18cm high, pinch off the top leaves. This encourages strong basal shoots. Never let the roots dry out, but also make sure that the soil does not get waterlogged. Fertilise again when the plants start to flower.
Calendula officinalis doubles as a herb and its petals are edible. Grow in full sun in fertile soil and water regularly. Plants grow up to 30 cm, with orange or yellow full-petalled daisy-like flowers. The stronger the colour of the petals the higher their medicinal value. Infuse the petals to make an anti-bacterial mouthwash or gargle for a sore throat or use it to bathe eyes to relieve conjunctivitis.

Dianthus barbatus interspecific varieties are generally short-lived perennials that can be grown as an annual. This type produces round heads of flowers on long, straight stems above dark green glossy foliage. ‘Amazon’ ( up to 60cm) has brilliant, neon coloured flowers while ‘Jolt’ is shorter (50cm) but is more heat tolerant so will grow through to summer. The hybrid ‘Sweet’ series grows even taller, up to 90cm and its long-stemmed flowers are fragrant and last very well in the vase. Staking is not necessary and they are ‘cut and come again’ flowers that bloom repeatedly. Grow in fertile soil that drains well and in full sun.
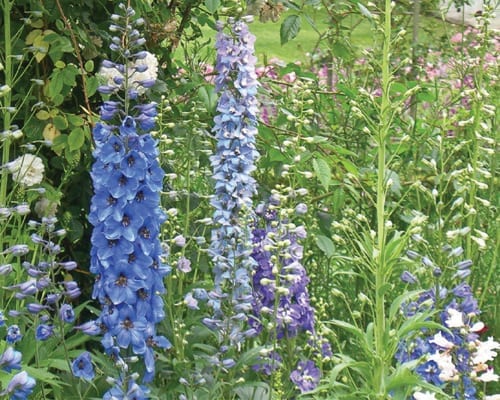
Delphinium has earned pride of place in the cut flower garden because of its majestic, royal blue flower spikes (white, pink and light blue as well). Planted during the cooler months it will flower in spring and early summer, so it is worth making a place for it. Plants like morning sun and afternoon shade, consistently moist soil that is mulched to keep the roots cool. Fertilise when plants start growing in spring. After cutting off spent flower spikes, fertilise and water and plants will bloom again in autumn. It is a short-lived perennial.
Larkspur (Delphinium Consolida) is a traditional cottage flower that is regarded as an annual version of delphinium. It also produces spikes of flowers in shades of blue, pink and white but its foliage differs, being finer and more fern-like. Plants don’t have quite the same majestic quality of the delphinium. Chill the seed before sowing and plant out in autumn so that the roots are established by winter. Plants will flower in spring.
Pansies offer a huge variety of colours and the larger flowered varieties like Matrix and Mammoth grow up to 20cm with individual flowers about 9cm wide. They can be planted as a border in front of other cut flowers or around the vegetables. Sun, fertile soil, and regular watering is all they need.
Phlox Paniculata is the phlox cut-flower variety and plants carry large beautiful clusters of scented flowers on sturdy stems. The flowers attract butterflies. Regular cutting or removing dead blooms encourages more flowers. They grow in ordinary garden soil (not too fertile), are water-wise, and should only be fertilised once, otherwise, they get too leafy and flower less.
Ranunculus is usually grown as a spring bulb and not regarded as a conventional cut flower. The Maché series, however, is available as young plants, and their strong stems make them good cut flowers. Their mature height is 40cm and the blooms are large and brilliantly coloured. Grow in full sun in soil that drains well and water regularly.
Snapdragons (Antirrhinum Majus) are also traditional cottage garden flowers and the tallest variety, aptly named Rocket, grows 70 to 90cm high, and is available in eight individual shades as well as a mix. For good stems, plant in full sun, in well-composted soil. Water well to get established and then taper off to regular, deep watering around the base of the plant. Overhead watering is not recommended. Remove dead flowers and stake if necessary. If cut back in spring it will act as a short-lived perennial and flower again in autumn or winter.
Sunflower (Helianthus) ‘Galilee Adami’ is a winter variety that blooms within 75 days. It has large flowers (16 to 18cm in diameter) and grows upright, between 1.3 and 1.7m with a strong stem. Side shoots produce smaller blooms that are even better for the vase. It is easy to grow, but needs space; ideal for the back of the food garden where there is plenty of sunshine.
Stocks (Matthiola Incana), like sweet peas, offer a delicious fragrance. The ‘Katz’ series is a cut-flower variety that grows up to 80cm high with a good range of colours; shades of purple, pink, yellow and pale apricot. The blooms last well when picked. They grow well in sandy soil (ideal for coastal gardens) and will tolerate heavier soil if plenty of compost is added. They prefer morning sun and will flower longer if watered and fed regularly.
Routine care
- Fertilise once a month with a potassium rich fertiliser, such as 5:1:5, 8:1:5, or Vigorosa.
- Water early in the morning and do not water every day but rather give a deep watering once or twice a week, depending on weather conditions. Whatever irrigation system is used, make sure that it won’t water-log the blooms.
- Spray regularly with organic insecticides to prevent sucking insects like aphids and thrips, as well as beetles that damage blooms.
- Pick regularly and deadhead to encourage the maximum production of more flowers. This prevents the plant from forming seeds which slows flower production.
Good to know: When picking, carry a bucket of water and put the cut blooms straight into the water. Flowers can be arranged immediately or kept in a bucket filled with water in a cool, dark room overnight. This allows the stems to absorb as much water as possible.

by Izolda | Apr 25, 2017 | Gardening, Grow Your Own, Herbs & Vegetables
[vc_row][vc_column][vc_column_text]All the rage at the moment. Full of concentrated nutrients and enzymes, they’re a great way to stay healthy through winter. Here’s how to get started:
You need:
- A block of palm coir
- A planting tray
- Vermiculite
Organic veggie seeds, such as mustard, cabbage, beets, radishes, kale and sunflowers, or a mixed pack
- Soak a palm coir block in water overnight. Fill your planting tray with the rehydrated coir.
- Use a wooden plank to level the palm coir. Do not compress the palm coir.
- Sprinkle seeds on the coir as evenly as possible.
- Cover the seeds with a thin layer of vermiculite, which helps to keep them moist.
- Water the seeds every day with a fine spay or using a watering can with a good even rose distribution.


Your microgreens should be ready for harvesting in 2-4 weeks. When they’re ready, simply cut the plants close to the soil surface and add them to smoothies, salads or stir-fries.

 [/vc_column_text][/vc_column][/vc_row][vc_row][vc_column][vc_separator][vc_column_text]Get everything you need to germinate your seeds with our Sowing With Success bundle![/vc_column_text][vc_empty_space height=”5px”]
[/vc_column][/vc_row]

by Izolda | Apr 21, 2017 | Grow Your Own, Herbs & Vegetables
Herbs for a hotpot
Herbs grow so well in pots that there is almost no excuse for not growing your own. Nothing solves a problem like a pot. No space, not enough sun, heavy clay soil, dogs that dig – the solution to all these problems is to grow herbs in pots. Then they can be squeezed into tiny corners, put on windowsills, balconies or patios, and kept sheltered from draughts and frost. From an aesthetic point of view, herbs in pots are decorative – they can be used to ‘furnish’ outdoor living areas, act as a feature within a garden and beautify a kitchen courtyard. In winter, potted herbs can be brought indoors or cared for in a sunny, sheltered spot.
The right planting mix
Most herbs like soil that drains well, and there are commercial herb potting mixes available. Alternatively, make a 50:50 mix of palm peat and ordinary potting soil mixed with bonemeal and some slow-release fertiliser, if available. Palm peat comes in compressed brick form and is soaked in water. It swells to about five times its size. The palm peat aids drainage but also helps to retain water so that nutrients are kept in suspension.


Herb container care
Container herbs should get at least five hours of sun per day. The more sun they get the better their flavour, health and resistance to pests and disease. Potted herbs should be watered more frequently than garden herbs because containers can lose moisture quickly, especially in the summer heat. Fertiliser also leaches out quickly in containers. A diluted liquid fertiliser applied once a week should keep potted herbs healthy. Regular picking is a form of pruning that encourages bushy growth. Either snip off short pieces or cut them back by at least two thirds.


Our winter hotpot collection
We chose three herbs that make an attractive combination in a flower pot, and a good combination in a cooking pot.
Sage
Sage is an evergreen perennial that grows to a height of about 30cm. Once established, water sage plants infrequently (they really do best with a bit of benign neglect). Keep in a sunny area that is sheltered from cold drafts. If you harvest leaves regularly then feed the plants twice a month with a diluted liquid fertiliser.
Thyme
Thyme is one of the easiest herbs to grow, and is very drought-tolerant. All types of thyme need full sun and friable, free-draining soil that tends towards the sandy side. Constant picking will keep them in shape and drenching them with a liquid fertiliser once or twice a month is a good idea if you are harvesting constantly.
Oregano
Being native to the Mediterranean, oregano likes like full sun and free-draining soil. It’s frost hardy and remains green throughout winter. It only needs to be watered once a week. Harvest or pinch back the leaves regularly to prevent woody growth. For best growth it should be fed every monthly with a liquid fertiliser.
Herbs add a tremendous amount of flavour to winter stews and will lift them to a new level. A beef bourguignon with carrots, onion, mushrooms, bacon and garlic would be tasty, but even more scrumptious with sage, oregano and thyme included in the list of ingredients.


by Izolda | Apr 13, 2017 | Recipes
I love to braai. I will happily cook for 20 or more people for Sunday lunch, and a fire is always part of the cooking process. After lunch, chunky logs are added to make a bonfire for everyone to enjoy.
Fresh herbs are an important part of any good cook’s arsenal, and I grow many of them to use in my kitchen. This is something I constantly encourage people to do on my shows, in the magazines and in the talks that I give. Remember even a few herbs grown in pots on a kitchen windowsill can make a huge difference to your cooking. One of my favourite recipe’s is lamb chops accompanied by pap and sauce. Simple, but delicious!


Herb-crusted lamb chops
- 8 lamb rib chops
- Salt and pepper
- Dijon mustard
- For the crust:
- 1 bunch parsley
- 2 stalks rosemary, leaves only
- 1 bunch thyme, leaves only
- ½ cup grated Parmesan cheese
- 2 tablespoons olive oil
For the crust, mix all the ingredients together in a food processor. Season the lamb with salt and pepper and place on the braai for 5 minutes, until browned on both sides. Take off the heat and brush each chop with Dijon mustard. Dip into the crust mixture, place on a baking tray and put into the over at 180 °C for 4 minutes. Serves 4.

Krummelpap and Sauce
Krummelpap (a crumbly version of mealie meal pap) and a simple sauce of tomatoes, onions and mushrooms is a favourite accompaniment to meat or fish on the braai. Krummelpap can also be made successfully in a microwave.
Krummelpap
- 2 cups water
- 1 cup mealie meal
- 1 teaspoon salt
Sauce
- 2 tablespoons butter
- 2 onions, sliced
- 6 tomatoes, grated
- 250g button mushrooms, sliced
- 2 tablespoons tomato pureé
- ½ cup white wine
- ½ cup chicken or beef stock
- 2 tablespoons chopped parsley
- Salt and pepper
For the krummelpap, bring the water to the boil and add the mealie meal and salt. Stir to mix, cover and simmer for 5 minutes. Stir with a fork until crumbly. Cover again and simmer on a very low heat for 40 minutes. For the sauce, heat the butter in a pan and add the onions. When the onions are soft, add mushrooms, tomatoes, wine, stock, parsley, salt and pepper. Simmer for 30 minutes. Serves 4-6.

Rosemary
Rosmarinus officinalis is very easy to grow and has a multitude of uses for the braai. While it is usually used as a flavouring agent for all types of dishes, particularly meat and potatoes, branches can also be stripped and used as skewers for meat or vegetables to impart that extra bit of flavour.
- Plant rosemary in full sun for best results.
- It can be grown in most soil types as long as it drains well.
- Shelter plants from frost in very cold regions.
- Provide room for growth, or you will need to keep it trimmed.
Attributes
- It is virtually indestructible in the garden.
- Rosemary is a good choice for coastal gardens as it can cope with the salty air.
- It will grow in poor, stony or chalky soil.
- It can be trimmed into a hedge.
- It is a good companion plant to carrots, beans and cabbages as it repels aphids and discourages snails, slugs, caterpillars and cutworms.
- It grows well from hardwood cuttings.
How to use
The leaves are rather tough, so it’s best to strip the leaves and chop them finely if adding to dishes. As a general flavourant, use whole sprigs added to roasting vegetables or meat such as chicken or lamb, so that the sprigs can be removed after cooking. It’s great for marinades, vinegars, oils and dressings. Small amounts can be used in baking for cakes and biscuits or for apple sauce and sorbets. For a fragrant winter braai, throw a few sprigs of rosemary on to the fire.

Braaied biltong and cheese rolls
A variation on sarmies for the braai. Butter slices of bread on the outside, sprinkle the inside with shaved biltong, and grated cheese, then roll up. Toast these on the braai for a few minutes on all sides and serve. Delicious.

by Izolda | Apr 6, 2017 | Gardening
April and May are the premier planting months for all colourful winter- and spring-flowering annuals. For a blaze of colour lasting for months, young seedlings need to be planted out during this period. Many gardeners forget about this important planting season, only realising they’ve missed the boat when the flowers start making an impact with their spectacular blooms. React now and join enlightened gardeners in planting the ‘winter colour run’ in time.
In warmer climates, plant seedlings 4-6 weeks later than in cooler climates. This is because warm temperatures can still occur during April, so always make sure that soil is well prepared before planting. Compost and root-stimulating fertiliser are important additives. Here are some of the most significant winter- and spring-flowering annuals for adding colour to the garden:
Pansies and Violas
Pansies and their smaller cousin, the viola, need little or no introduction. They are among the best-known and most-loved flower seedlings in the world. Some have delicate faces on the flattish flowers, while others are clear single colours that shine brightly in the winter and spring sunshine. They’re unsurpassed for mass bedding, borders and garden edging, pots and containers, hanging baskets and window boxes. Pansies and violas have a place in every garden no matter the size.
Planting
- Plant in full sun or light shade.
- Well-drained loamy soils.
- Plant at the same depth as in nursery tray. Do not bury.
- Space seedlings 20-25 cm apart.
- Water well immediately after planting.
- Apply cutworm bait after watering.
Care
- Keep plants evenly moist and water in the morning.
- Remove flower buds from small plants to allow vegetative growth to dominate.
- Feed or fertilise every 2 weeks with a 3:1:6 water-soluble plant food.
- Check regularly for pests and disease.
- Once flowering commences deadhead every second day by removing spent flowers.
- When plants begin to look scraggly and unproductive, remove and replace with summer flowers.
Primulas and Primroses
Shaded areas in the garden are always in need of a touch of colour, especially in winter. Primula malacoides (fairy primrose) and Primula acaulis (primrose) fulfil this function perfectly. They lend vibrancy to the winter and spring garden, growing in even the coldest of areas. They are ideal for mass plantings, for pots and containers and for brightening up any dark corners.
Planting
- Plant in light to deep shade.
- Grow in rich, loamy, acidic soil. Add peat moss to improve soil conditions.
- Do not plant plants too deeply.
- Space seedlings 20-30 cm apart.
- Water to settle plants after planting.
- Apply cutworm bait.
Care
- Keep plants moist. Do not let them dry out.
- Pinch out flower buds until plants are fully developed.
- Apply 3:1:6 water-soluble fertiliser every 14-21 days.
- Check for pests and diseases. Aphids and red spider mite are a problem.
- Deadhead spent flower spikes.
- Replace with summer annuals when plants are spent.
Iceland poppies
Iceland poppies are the doyen of spring cut flowers, with their papery petals in various shades and hues. Most poppies are cultivated for picking, while they also make a statement if left to flower in the garden. They are best planted en masse, although they integrate well in the mixed herbaceous border.
Planting
- Full sun is vital for happy poppies.
- Grow in well-drained, preferably slightly alkaline, soil. Add lime in acidic soil regions.
- Handle seedlings and root balls with care. They are fragile.
- Space plants 30 cm apart.
- Water after transplanting.
- Apply cutworm bait.
Care
- Keep evenly moist. Do not overwater.
- Pinch out the first flower buds to appear. This ensures better flowers on strong stems later.
- Side-dress with 3:1:5 slow-release nitrogen fertiliser every 6-8 weeks.
- Check for mildew and fungal infections, as well as aphids on flower buds.
- Pick flowers almost daily to encourage more blooms.
- Replace with summer seedlings when spent.
Petunias
Amongst the most vibrant and spectacular of all flower seedlings, there are always new hybrids and cultivars of Petunias arriving on the market in amazing colour variations. However, the white, red and pink petunias still reign supreme when it comes to making a floral spectacle. They are great plants for bedding, pots and window boxes, as well as ideal for hanging baskets. Remember that petunias are intolerant of rain and wet weather.
Planting
- Grow in full sun. Shade makes growth weak and straggly.
- Plant in well-drained, loamy soil.
- Do not bury plants when transplanting.
- Space seedlings 25 cm apart.
- Water to settle in after planting.
- Apply cutworm bait and snail bait in warmer climates.
Care
- Water when plants have dried out. Do not overwater.
- If seedlings are long and leggy, pinch out the growth tip to encourage bushing.
- Feed regularly every 14 days with 3:1:6 water-soluble plant food.
- Check for pests and diseases.
- Remove spent flowers. Prune back long, leggy plants.
- Replace with summer flowers when petunias are over.

by Izolda | Apr 6, 2017 | Gardening, Grow Your Own, Herbs & Vegetables
Laying The Foundation
Proper soil preparation is the foundation on which a productive food garden is built so it’s important not to skip this step, whether you are working with virgin soil or previously used beds.
It is hard work and if the soil has not been worked before, it could take half a day to a day to prepare the beds for a 9 m² area. Double digging the beds loosens and aerates the soil. Dig to a depth of 60cm and incorporate 10 litres of compost (about a bucket full) per square metre.
The aim is to have friable soil that drains well and also allows the roots of the vegetables to draw up the oxygen and water. The ideal soil structure is 50% space (water and air) and 50% minerals.
This method of double digging does not move subsoil to the top or vice versa. There is no displacement of the aerobic micro-organisms that exist in the top 30cm of soil or the anaerobic organisms in the lower level that does not need oxygen to function.
A bed that has been prepared in this way will not need to be dug again like this for the next four to five years. When planting a new crop it just needs to be topped up with compost and topsoil which is lightly forked in.
Double Digging Step-By-Step

Step one: Water the area two days in advance, then measure and mark out the beds using sticks and twine.

Step two: Dig the bed in sections, about 1m² at a time. Remove the top 30cm of soil, about the depth of a spade tine, and put it to one side.

Step three: Using a fork loosen the second layer of soil to a depth of 30cm but do not remove the soil. Fork in compost. One bucket of compost (10 litres) is used per 1m² for enriching both the topsoil and subsoil.

Step four: Dig the next 1m² section but do not put the top soil to one side. That top soil (mixed with compost) is turned into the first section.

Step five: Follow this process of turning the topsoil from one section into the previous section until you reach the end of the bed. At the end of the bed, you will take the top soil from the first section and mix it into the last section. Digging the bed in sections and completing each section is actually more time and labour saving than digging all the soil out, mixing it with compost and returning the soil. It also allows you to complete the job in phases.
Step six: You will find that with the addition of the compost and the aeration of the soil, the level of the bed will be about 15cm higher than the surrounding soil. Skim off the top soil from the pathway and add it to the bed. This further raises the bed.

Step seven: Rake the bed to level it. Any clumps of soil, roots etc, can be raked into the pathway but rocks and stones should be removed.

Step eight: Rake the soil so that it is worked to a fine tilth, because in-situ sowing requires that the soil should be fine, like that of a seedbed. For an even finer tilth, sprinkle compost over the top of the bed and lightly rake it in. The seeds can be sown directly into the soil and will germinate easily.
Step nine: Water the bed with a watering can or hose with a fine rose nozzle that won’t splash the soil. Let it stand for two days before sowing.
Tip: Mulch the pathways with lawn cuttings, pruned vegetation and other organic material that breaks down as you walk on it. When the bed is being prepared for a second crop, scoop about 5cm of soil from the pathway (which includes all the organic material), put it on the bed and then add 5 to 10cm of compost before turning it in with a fork. All the clumps go back into the pathway to be tramped over and broken down. In this way, the pathway is used to build the fertility of the bed.
Click here to shop our fantastic range of raw seeds
Covering Crops
Poor soil can be enriched by planting cover crops as a green manure. As soon as the crop starts to flower dig it into the soil. The plants should not be allowed to flower or fruit because the aim is to enrich the soil. Mustard leaves, borage, broad beans and peas are ideal cover crops because they add nitrogen and other minerals to the soil.
Options For Veggie Beds
We are all different. Some of us are straight up and down types; others like to go around in circles! Choose the kind of bed that suits your personality.
Conventional, rectangular beds produce a well-ordered food garden, easy to plan and work in. A border of 30cm on either side of each bed allows for expansion; for future pathways and beds. The bed width of 1m allows the centre to be reached from any side. A border of 1m surrounds the garden for wheelbarrow access.
An alternative to the 1m wide beds is to make narrower 60cm wide beds that comfortably allow one to straddle the beds when working on them.
Keyhole beds are often used in permaculture and are regarded as being the most efficient kind of bed because it is easy to work in them. They have a keyhole or horseshoe shape which allows you to stand in the centre and work from there.
Eco circle beds consist of a single 1m diameter circle or three 1m diameter circles that connect but not overlap to form a clover leaf circle. Usually, a pest repellent herb is planted in the centre of the cloverleaf circle. A 20cm diameter pot with drainage holes is sunk in the centre of each circle and vegetables are planted about 15cm from the pot. The veggies are watered by filling the pot with water which drains out at root level. These beds are ideal if water is scarce or not easily accessible. It also allows for natural pest control through companion planting.
Square foot beds are one metre by one metre, further divided up into a grid, with each block corresponding roughly to the size of a foot. This provides enough space for 16 different crops so companion planting and diversity is easy to achieve. The benefit of this bed is that you tend to sow what you need and not over sow because of limited space.
Wagon wheel is usually used for herbs but also works with a combination of vegetables. The pathways make it easy to access the herbs and vegetables.
Raised built beds are easier to work if you have back problems. They require a greater initial outlay and effort and are permanent. They act as giant containers so will need good drainage and will have to be filled up with new soil and compost fairly regularly. They are also a solution for sloping areas.
Lasagna gardening is a term adopted in the United States but is basically the same as sheet mulching. The soil is not dug over but alternate layers of organic material and garden soil are built up, like lasagna! The assumption is that earthworms and other microorganisms will move upwards. However, if there is limited biological life in the soil it will take a long time for the bed to reach the stage where vegetables can be planted. This is particularly a problem if the virgin soil is compacted.
Mono-Cropping or Poly-Cropping?
Mono-cropping refers to the commercial agriculture practice of planting hectares of the same kind of crop. In a residential garden, planting the same veggies together in one bed does not have the same effect because there is usually enough diversity in the surrounding garden to attract birds and beneficial insects. Poly-cropping is an equally valid choice as it ensures diversity through companion planting that puts together beneficial herbs, vegetables and flowers.
Checking The Soil PH
The ideal soil for vegetables has a ph of 6.5 to 6.8. The ph can be checked with a soil ph meter which is easily available from a garden centre or hardware centre. Make sure the soil is moist before putting in the meter and leave it in place for a while before taking the reading.
Soil with a ph in this range does not need lime. Should one want to add lime, it should not be more than half a cup per square metre every two or three years. Soil that has been over limed will take three to four years to correct. If the alkaline levels are too low it is better to use azalea compost or pine needles to raise the acid level in the soil.
With all of this out the way, the only thing left to do is purchase a wonderful set of herb markers.

by Izolda | Apr 6, 2017 | Gardening, Gardening Trends & Inspiration
Its bulb time! Don’t miss out! It is definitely a great time to get your garden ready for a wonderful splash of winter colour. Aside from bulbs, it is always a good idea to get your garden a Sonic Mole Repeller to avoid a lot of hard work for nothing.
Tried and trusted
One minute you’ll see them for sale and then, on your next visit, when you’ve finally decided what you want, all you find is empty shelves because every single one has been sold and, alas, there will be no more this season. Bulb season works like that; there are limited quantities and a limited time in which they are available. So don’t get left in the dust! Here are some of my all-time-favourites; they always work so well in my garden (with minimum fuss), they evoke memories of my childhood and their beauty never ceases to amaze me.
The ranunculus as we know it today is probably one of the greatest success stories in the history of plant breeding. The blooms of this versatile plant rival roses and peonies for their sheer beauty and the profusion in which they are borne. They are easy to grow, make superb cut flowers, bloom when there is little other colour available and can be planted almost anywhere. Plus they’re not expensive! Buy your ranunculus bulbs when they appear on the shelves (generally near the end of February) and store them at room temperature, then plant them out during April or May. They respond to cool, moist weather.
Indigenous freesias are a favourite because they offer three excellent qualities: flower power, heavenly scent and ease of growth. They come in a wide variety of colours and the glorious scent that they exude will sweeten any room. Grown in light dappled sunlight or semi-shade, they lend a delightful fragrance to spring evenings, especially if they are grown in a courtyard where their scent can be ‘trapped’ for your pleasure.
‘Paper Whites’ produce masses of scented white blooms very early in the season – usually in late June. They are so tough they will even grow if they are placed on a pebble-filled bowl of water. If you have any youngsters in the house, this is an excellent way to show them how wonderous Mother Nature is. For the next couple of months you and your family can watch enthralled as first the roots, then the stems and finally the spikes of pretty flowers emerge from the bulbs.
Shop at my online store for all of your gardening needs, from carved wooden Dibblers to luxurious Garden Hoses.