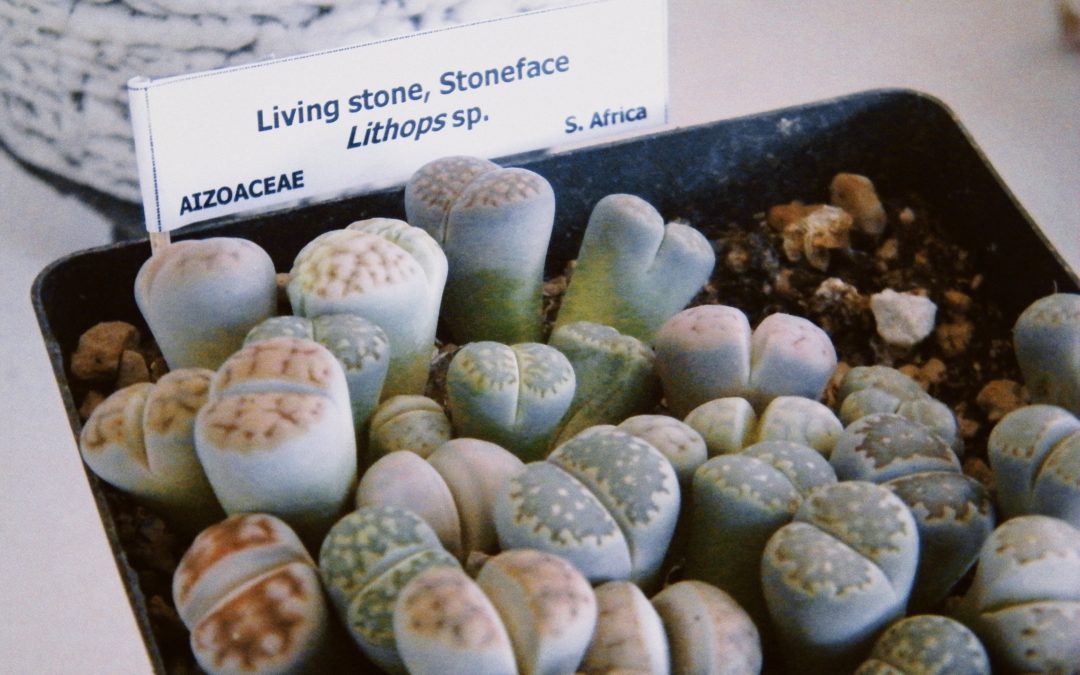
On the list of plants that not only tolerate but actually prefer a little neglect, Lithops certainly feature in the top spot. These strange succulents are famous for their interesting shapes that awarded them the name Living Stone Plants. They also resemble hooves, or maybe tiny brains, depending on which variety you are dealing with.
Many gardeners find these plants confusing or difficult to care for, largely because their care is so different from other succulent plants. But once you understand their environment and needs, these little plants will become one of the lowest-maintenance (and strangest looking) plants in your succulent garden.
Light
In their natural environments – the open grasslands or rocky areas of southern Africa – lithops get plenty of direct sun throughout the day. Like other succulents, these conditions need to be replicated to ensure healthy growth. Under low light conditions, like those indoors, the compact leaves will stretch towards the nearest light source, known as etiolation. The leaves will also become dull and discoloured. To preserve the shape and colour, ensure your lithops gets at least 6 hours of direct sunlight per day.
Water
Lithops are one of the most drought-friendly plants you can buy. In their native habitats, they are used to receiving little to no water for several months due to lack of rainfall. They are able to survive this way because their impressive leaves store enough water to keep the plant alive.
To mimic these drought-like conditions, your lithops will need tiny amounts of water every couple of weeks, and only during the growing seasons of spring and autumn. In summer and winter, the plants go dormant and don’t need to be watered at all (unless the leaves start to wrinkle, indicating the leaf reservoir is running out of water). A teaspoon of water applied every two weeks is all you need to keep the leaves plump and happy.
Soil
Lithops live in sandy, rocky soil with little nutrients – what we gardeners would consider poor quality soil. The soil should be incredibly well-draining and gritty. The less water it holds, the better. Use a cactus potting mix or create your own soil mix using a combination of potting mix, pool sand, gravel, and perlite.
Temperature
Like true South Africans, lithops cannot stand the cold. When left outdoors in temperatures lower than 10 degrees for extended periods of time, the leaves will begin to die off. If they face any frost, the cell walls of the plant leaves rupture, causing any exposed sections to rot. It is incredibly difficult to save a lithops damaged by the cold, so it’s best to avoid this problem and bring them inside if cold weather is forecast.
Lithops Quick Facts:
Lithops will flower after 3 to 5 years, once per season. These flowers produce seed pods that explode outwards when exposed to moisture, spreading new seeds around the plant.
Don’t be alarmed if your leaves appear to be splitting – new leaf pairs emerge from the centre of the plant, drawing moisture from the previous leaf pair until they die off.
It is best not to fertilize your lithops, as it is very easy to overfertilize and cause damage to the plant. If the plant is not flowering, you can use a heavily diluted cactus fertilizer, but do so sparingly.
Lithops leaves are fused and directly connected to the roots. Most of the leaf is buried under the soil to protect it from predators and the sun, blending in with the surrounding rocks so well that they are often difficult to spot in the wild. The tops of the leaves are translucent to allow more light to reach the parts of the plant underground.
Inspired by the terrarium trend and museum dioramas, there’s great fun to be had in planting up clear containers with succulents, moss and plastic wildlife to create beautiful terrariums.
For Your Terrariums You Will Need:
An assortment of glass or clear plastic/ acrylic containers: terrariums, vases, medium to large mason jars as well as small fish bowls or tanks
Child-friendly, spike-free succulents
Spray-bottle filled with water
Small pebbles as well as decorative stones
Potting soil
Moss (available from nurseries)
Plastic animal toys
Instructions:
1. Place a generous layer of small stones or pebbles in the bottom of the container.
2. Top with soil, leaving a few inches of space at the top for plants (depending on their size) and small plastic toys.
3. Plant the succulents and create scenes using the toys and moss.
4. Spray your terrariums with a fine mist of water as needed.
Tips
Terrariums make a great DIY gift for little friends: pop a suitable container, several small succulents and a mini spray-bottle into a gift box along with soil, pebbles and plastic toys sorted into separate Ziploc bags. Don’t forget hand-written instructions.
There’s no limit to how creative you can get: think colourful gravel, fairies, toadstools and dinosaurs.
Before assembling your terrariums, mark the inside of the jar with dots of glow-in-the-dark paint to up the cool factor.
TEXT Mandy Allen/Bureaux PRODUCTION Jeanne Botes PHOTOGRAPHS Warren Heath/Bureaux. www.bureaux.co.za
You should all know by now that I just love succulents! Their diversity is incredible, and with so many to choose from, they make the perfect collectable. They are tough and require very little attention. The most important thing is enough sun and not to over water.
Here is a great way to showcase your succulents, whether on a coffee table or as a centrepiece at the dinner table.
You will need:
1 x Glass bowl
1 x Small bag of silica sand (it is the sand used in pool filtration)
Place the coarse gravel at the bottom of the glass bowl.
Place 5cm of silica and potting soil mix on top of gravel.
Remove your succulents from their pots and discard excess soil on roots, then place in position in your glass bowl, along with your candle.
Fill with silica sand mix to cover the roots.
Place your decorative pebbles around the succulents carefully, and try to avoid getting stones into the leaves of the plants. If it does happen, use a paint brush to brush off plant.
Water lightly. You will see the water drip down to the bottom layer of gravel – keep an eye on your water level and only water if the soil is totally dry
All living things need water but some need less than others. Thank goodness for that. If you live in a low rainfall area, here is your answer to a beautiful garden. Playing with drought tolerant plants and succulents has never been more fun! The biggest part of this pot recipe is your soil preparation.
All you need is:
1 bucket of potting soil (it can be a rusty bucket or a plastic one)
Block of palm peat, reconstituted in water (that means, add a block to 5l of water in a container and watch your palm peat grow!)
2 cups vermiculite
A handful of organic pellets like Atlantic Bio Ocean
A handful of bonemeal
5g of water retaining granules, EXLGel is a good one
Gravel for drainage
A sturdy pot of your liking
A selection of plants like Kalanchoe thyrsiflora, Sedum tetractinum, Gazanias (proudly from South Africa) and Euphorbia “Diamont Frost”
Or just play with a variety of Sedums and Echeverias, their contrasting colours and foliage will be a delight to your eyes.
How to pot up:
Make a soil mix by mixing the following together: half potting soil, palm peat(only used half of the reconstituted mass, the rest you can store safely as is), vermiculite, handful of organic fertiliser, handful of bonemeal and your water retaining granules. Mix together well.
Make sure that your pot has good drainage holes, now cover these up with your gravel. This will stop your soil mix from clogging the drainage holes and retaining water in your pot. Drought hardy plants don’t like wet feet.
Fill your pot ¾ with your soil mix.
To get the best look from all angles after planting, start by placing your highest plant in the centre of the pot. Now you can play with the middle height and add some interest by placing your sedums on the edge of the pot, allowing them to trail over the side.
Press the plants down firmly as you fill your soil around them, water well.
Sit back, relax and enjoy your hard work.
Remember:Liquid fertiliseevery two weeks. Even drought tolerant plants need food.
Our Team is ready to answer any questions or concerns that you may have. Feel free to get in touch!
Office Hours: 8:00am – 16:00pm
If we are not available then email us and we will get back to you as soon as possible. hello@tanyavisser.com