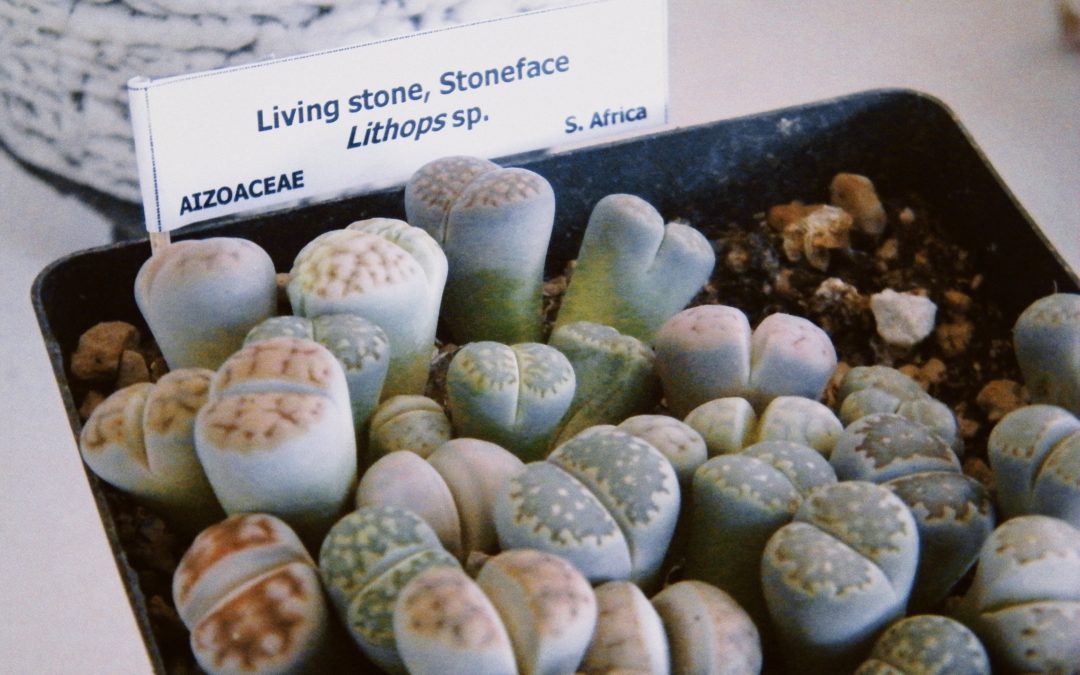
On the list of plants that not only tolerate but actually prefer a little neglect, Lithops certainly feature in the top spot. These strange succulents are famous for their interesting shapes that awarded them the name Living Stone Plants. They also resemble hooves, or maybe tiny brains, depending on which variety you are dealing with.
Many gardeners find these plants confusing or difficult to care for, largely because their care is so different from other succulent plants. But once you understand their environment and needs, these little plants will become one of the lowest-maintenance (and strangest looking) plants in your succulent garden.
Light
In their natural environments – the open grasslands or rocky areas of southern Africa – lithops get plenty of direct sun throughout the day. Like other succulents, these conditions need to be replicated to ensure healthy growth. Under low light conditions, like those indoors, the compact leaves will stretch towards the nearest light source, known as etiolation. The leaves will also become dull and discoloured. To preserve the shape and colour, ensure your lithops gets at least 6 hours of direct sunlight per day.
Water
Lithops are one of the most drought-friendly plants you can buy. In their native habitats, they are used to receiving little to no water for several months due to lack of rainfall. They are able to survive this way because their impressive leaves store enough water to keep the plant alive.
To mimic these drought-like conditions, your lithops will need tiny amounts of water every couple of weeks, and only during the growing seasons of spring and autumn. In summer and winter, the plants go dormant and don’t need to be watered at all (unless the leaves start to wrinkle, indicating the leaf reservoir is running out of water). A teaspoon of water applied every two weeks is all you need to keep the leaves plump and happy.
Soil
Lithops live in sandy, rocky soil with little nutrients – what we gardeners would consider poor quality soil. The soil should be incredibly well-draining and gritty. The less water it holds, the better. Use a cactus potting mix or create your own soil mix using a combination of potting mix, pool sand, gravel, and perlite.
Temperature
Like true South Africans, lithops cannot stand the cold. When left outdoors in temperatures lower than 10 degrees for extended periods of time, the leaves will begin to die off. If they face any frost, the cell walls of the plant leaves rupture, causing any exposed sections to rot. It is incredibly difficult to save a lithops damaged by the cold, so it’s best to avoid this problem and bring them inside if cold weather is forecast.
Lithops Quick Facts:
Lithops will flower after 3 to 5 years, once per season. These flowers produce seed pods that explode outwards when exposed to moisture, spreading new seeds around the plant.
Don’t be alarmed if your leaves appear to be splitting – new leaf pairs emerge from the centre of the plant, drawing moisture from the previous leaf pair until they die off.
It is best not to fertilize your lithops, as it is very easy to overfertilize and cause damage to the plant. If the plant is not flowering, you can use a heavily diluted cactus fertilizer, but do so sparingly.
Lithops leaves are fused and directly connected to the roots. Most of the leaf is buried under the soil to protect it from predators and the sun, blending in with the surrounding rocks so well that they are often difficult to spot in the wild. The tops of the leaves are translucent to allow more light to reach the parts of the plant underground.
When it comes to the causes of houseplant problems (and demises), water is usually the number one culprit. For beginner gardeners, standard advice such as “water once a week but do not overwater” may be difficult to understand, leading to incorrect practices and unhappy plants. Understanding when to water and how to water is vital to plant care success – here’s how you can ensure you get it right.
When to Water
It may be convenient for humans to live on a schedule, but plants don’t. Their needs are not determined by the days of the week. How often you water your plant will depend on several factors: soil conditions, the amount of light the plant is getting, or the seasons for example. And ‘right time’ almost never coincides with a perfect schedule.
The first factor, soil conditions, relates to the amount of moisture the plant needs in the soil. All plants need water at some point, but they all prefer different amounts.
For example, succulents and cacti, holding most of the water they need in their leaves, prefer the soil to be completely dried out before they are watered again. The plant can only hold so much water in the leaves – any remaining water will stay in the soil and may cause the roots to rot.
Most indoor plants (usually tropical plants) need a good amount of water as their leaves do not store much. But they don’t like environments that are too moist either, so the top layer of soil should be dried out completely before watering. Other plants, like ferns with extremely thin leaves, like moist soil and a moist environment (although this does not mean soggy).
The soil will change conditions at different times depending on your environment, how much light the plant is getting, and the seasons (impacted by both changes in weather and increased growth rate in Spring).
Rather than watering your plants on a weekly basis (or whatever period is recommended) test the soil with your finger to determine if your plant needs water, based on the characteristics we interpreted before. If you like routine, you can always set a time once or twice a week to check all your plants and water as needed, instead of having to check them every day, or watering them anyway and facing the dreaded ‘overwatering’ scenario.
How to Water
There are three main methods of watering your indoor plants.
The first is to water gently with a watering can where the plant is placed. This is a handy method for a quick top-up but comes with some caveats. You’ll need to know exactly how much water the pot holds, so you water the soil enough to reach the bottom, but not so much that water runs out the drainage holes at the bottom (and hopefully onto the tray beneath it, not your shelf). If you do overwater, you will have to empty each tray to prevent the water from stagnating. Despite the caveats, this method is ideal for indoor gardeners with little time and a lot of plants.
The second method is watering over the sink, completely drenching the soil, and allowing the excess to run through. This may be tedious if you have a lot of plants, but it is a more reliable method.
If you forgot a watering cycle or two, soaking the soil over the sink may not be sufficient. Extremely dry soil will pull away from the sides of the pot and repel water (called hydrophobic soil). When the soil is extremely dry, the water will run off the top, down the sides of the pot, and out the drainage holes, without penetrating the soil. In these cases, you will need to use the third watering method – submerging.
Fill a sink or large container with a shallow layer of water and place the plants inside, allowing them to draw the water up from the bottom of the container. This way the plants can take up as much water as they need with even distribution. This process takes a couple of hours, but most plants should not be left in water for too long and can be removed as soon as the soil is soaked through.
It’s tough out there folks. We have to save, save and save all the water we can! Harsh restrictions have been put in place by certain municipalities in South Africa. For me, this is an ideal opportunity to change our gardening ‘bad habits’ and, most importantly, to toughen up our plants!
Here are my top water wise gardening tips for surviving the water restrictions:
#1
If you have to choose what to keep alive, then let the lawn go but please don’t dig it up. It’s far better to have dead grass covering and protecting the soil than nothing at all. Grass is the least of your worries when it comes to your garden. When the restrictions are lifted, it’s a simple day project to replace a dead lawn with instant lawn sods.[ux_image id=”3747″]
[gap height=”20px”]
#2
Invest in the Gardena drill pump. It’s amazing and will take away all the hassle of distributing grey water to your garden beds. Remember – grey water (from your bath, for example) is a water wise must and your garden will love it.[ux_image id=”3843″]
[gap height=”20px”]
#3
Take a 2-litre plastic bottle and turn it into a slow-release drip irrigation system for trees and large shrubs:
Using a cordless drill with a maximum of a 5mm drill bit, drill about twenty holes around the perimeter of the plastic bottle.
Bury the bottle alongside the plant with its neck sticking out of the soil.
Simply open the plastic lid and fill the bottle with water. The water is then released slowly and gently as the plant needs it. Simple and easy!
Our Team is ready to answer any questions or concerns that you may have. Feel free to get in touch!
Office Hours: 8:00am – 16:00pm
If we are not available then email us and we will get back to you as soon as possible. hello@tanyavisser.com