Salvias may be tough and low-maintenance, but we’ve got some tips that will help you to unleash their superpowers in the garden.
Imagine a group of plants that are so attractive and useful that their awesomeness couldn’t be contained in a whole library. These plants embrace almost any climate with a sassy attitude and have secret water-saving superpowers. Yes, we’re talking about the ultimate superheroes of the plant world – salvias. These are our 7 tips for the best results.
1. Choose the right salvia for your climate
Salvias come in various shapes and sizes, and their adaptability to different climates is like that of chameleons. Some can brave low winter temperatures, sweltering summer heat and strong coastal winds, while others are more delicate. Be a savvy sage parent and choose the right type of salvia for your specific climate, allowing them to feel at home.
2. Provide plenty of sunshine
Salvias thrive in the sunshine, so find them a prime spot where they can bask in at least 6 hours of sun each day. More sun means more sizzling blooms to enjoy
3. Prepare well-draining soil
For salvia’s ideal match, opt for sandy loam soil that is well-draining. Before planting, give your salvias a head-start by preparing the soil with a generous dose of compost and bonemeal. This will provide them with the nutrients they need for healthy growth.
4. Feeding and mulching
Salvias aren’t particularly demanding when it comes to feeding, but smaller, more compact plants can benefit from a slowrelease fertiliser (like an organic 3:1:5) after their spring flower show. In autumn, add a layer of shredded leaves or wood chips as mulch around the base of the plants. This acts as a warm blanket, ensuring their survival during the winter months.
5. Watering Salvias
Salvias are drought-tolerant champions and can endure long periods without water. However, during scorching summers when the soil has completely dried out, they will appreciate a deep watering once or twice a week. Remember to allow the soil to dry out between waterings to prevent overwatering.
6. Regular deadheading and pruning
Deadhead spent flowers regularly to give your salvias a mini makeover, keeping them looking fresh. After their flowering season is over, whether it’s in late autumn or spring, give them a full makeover with a good prune. This will help maintain their shape, prevent them from growing too big and leggy, and promote healthier growth. A little trim before the winter slumber works wonders.
7. Resilient and attractive to wildlife
Salvias are resilient against most pests and diseases, acting as real sun-sizzling heroes in your garden. They also attract beneficial insects like bees, butterflies and birds, turning your garden into a haven for wildlife.
By following these simple tips, you can keep your salvias sizzling and continue to enjoy their vibrant beauty in the garden. Watch them thrive, dazzle and bring never-ending joy to your gardening experience.
These three plants never disappoint in the perennial quest for effortless garden beauty.
We’ve all had those moments when we yearn for a low-maintenance garden that can still captivate with its vibrant colours and textures. But choosing the right plants can be a challenge. Fear not! We’ve got a fabulous foursome that will bring life and allure to gardens across different climates, from Muizenberg to Musina. From the dramatic Carex ‘Everillo’ to the enchanting Hebe ‘Sunset Boulevard’, and the compact yet mighty ‘HibisQs’ series, let’s explore these three plants that will work their magic while you sit back and relax.
Carex ‘Everillo’Hebe ‘Sunset Boulevard’‘HibisQs’
Carex
Our first favourite of the three chommies is actually a whole genus – Carex. There are many varieties to choose from, but let’s shake up those sunny or shady garden spots with the showstopper Carex ‘Everillo’ or the majestic Carex ‘Feather Falls’.
‘Everillo’ is a trendsetter with cascading foliage that starts lime-green and changes to golden-yellow. ‘Feather Falls’ has clean, variegated green and white foliage and gets beautiful feathery flower plumes in spring. Both have similar growing characteristics:
They are evergreen.
They can be planted in the garden or in containers. Low-maintenance plants that are tough and resistant to cold and frost.
Create a dramatic visual impact.
Reliable choices for any garden.
Require well-draining soil enriched with compost and bonemeal.
Should be pruned regularly and heavily to keep them neat.
Reach 50 x 50cm.
Hebe ‘Sunset Boulevard’
Hold on to your gardening hats for famous hebes and let Hebe ‘Sunset Boulevard’ steal the spotlight.
This trendy shrub reaches a height of 1m.
It has dark pink flowers that bloom abundantly in summer and autumn.
It has glossy dark leaves and sassy red mid-ribs, adding glamour to the garden.
It thrives in well-drained soil.
Protection from frost is necessary.
It can be enjoyed in pots, rock gardens or mass plantings.
‘HibisQs’
Looking for vibrant flowers to brighten your garden and create the perfect selfie backdrop? Look no further than the compact hybrid ‘HibisQs’, bred from the hibiscus but with longer lasting flowers.
These small but mighty plants reach a height of up to 2m and width of 1.5m.
They showcase lush foliage and have a never-ending blooming season.
Each vibrant bloom features a contrasting eye zone or throat, adding visual appeal.
Planting one can instantly transform your patio, balcony or garden into a tropical paradise.
Plant in well-draining soil.
Protection from cold and frost is necessary.
Regular watering and appropriate fertilisation are essential for best results.
The magic mathematics of a good-looking pot, starts with a thriller, a filler and a spiller. Potted magic This ratio of plants is the beginning of potted success. Our contrasting colour combination here will brighten up any spot in need of a makeover.
You will need:
A pot with drainage holes
Pebbles for drainage (you can even use smaller broken up pieces of an old clay pot).
Fresh potting soil
Compost
Slow- release fertiliser
Bonemeal
Decorative bark or wood mulch
ThrillerSpillerFiller
Plants to use:
A thriller – we chose Agapanthus ‘Bucanneer’ for this task for its ability to grow tall impressive stems of purple flowers that last up to 8 months of the year
A filler – with its stunning dark foliage, Loropetalum ‘Plum Gorgeous’ covers colour needs even when there are no flowers in the pot.
Two spillers – amazing yellow lime afro-like foliage, makes Carex‘Everillo’ an ideal spiller to contrast with the other two.
Steps
First prepare the soil with half potting soil and half compost and add in 2 handfuls of fertiliser. Add in some bonemeal to provide extra calcium for the plants. Give this a good mix.
Add your drainage pebbles to the bottom of the pot.
Fill the pot halfway with your soil mix.
Carefully remove the plants from their bags without disturbing the roots. Gently tease any compacted roots with the tips of your fingers to encourage the roots to grow laterally once planted.
In goes the agapanthus. It’s important to make sure that the top of the plant sits about 2cm below the pot rim so there is no water spillage when watering. Next the loropetalum and finally the carex.
Add some more soil under a plant, if you want to play with the height.
To finish off, fill the pot with the remaining soil mix, firming down with your trowel handle so that the plants are snug and secure.
Add a layer of decorative bark or wood mulch and give your newly potted garden a good drink of water. Continue to water at least twice a week to get the plants well settled.
Follow the Thanks Plants campaign on www.thanksplantssa.co.za and enter the competition in the August, September and October issues of The Gardener and Die Tuinier.
In South Africa, if your lavender has been in your garden for more than two years, well, you’re a botanical boss! If not, we have some suggestions.
Lavenders love warm and dry conditions, plus they are relatively hardy against the cold and can withstand light frost. Plant them in a sunny spot where they can soak up the sunbeams all day long. Don’t plant them too close to each other, to give them some room to breathe.
Common Lavender problems
Lavenders need a good drink to quench their thirst, but be careful not to drown their delicate roots as they don’t like having wet feet. Water regularly until their roots are strong, allowing the soil to dry out slightly between watering sessions.
Overwatering and too much humidity can cause fungal diseases. Use a contact fungicide as a foliar spray to treat your lavender and keep them happy and thriving – just make sure to read the instructions and dilution rate.
Lavenders need slightly alkaline, sandy to loamy soil that is well-draining. If your garden soil feels sticky, like a heavy clay soil, work in generous quantities of river sand and compost to improve drainage. Or plant in raised beds or pots filled with good quality compost and potting soil.
Lavenders do need a haircut after they have finished blooming, to keep them looking gorgeous. We don’t want our lavender to grow tall and leggy with bare stems and foliage only at the top. Look at where your lavender is starting to push new leaves, and avoid cutting into a stem that has no foliage.
1234
Steps for pruning lavender
1. Divide the plant into 3 equal parts.
2. Cut off the top two thirds from half the plant only.
3. Wait until the pruned section starts to grow and then cut the other half of the plant.
4. Remember to feed and water your lavender after their trim.
Follow the Thanks Plants campaign on www.thanksplantssa.co.za and enter the competition in the August, September and October issues of The Gardener and Die Tuinier.
Lavender brings life to the garden with its vibrant purple hues and a fragrance that puts perfumes to shame.
A sun-loving superstar that attracts bees and butterflies while keeping pesky insects at bay, it thrives in well-drained sandy soil. This botanical diva is also waterwise and prolific, making it a perfect choice for pots or garden beds.
Lavender uses
Lavender has been a healing hero for centuries. Its antispasmodic, antiseptic and antibacterial powers, make it the ultimate first-aider to treat cuts, burns, stings and bruises.
Add a touch of finely chopped lavender leaves and flowers to stews, soups, roasted veggies or even rice – for a hint of perfume.
Lavender water has been around forever, and can be used as perfume or a hair rinse. Make your own by following the steps.
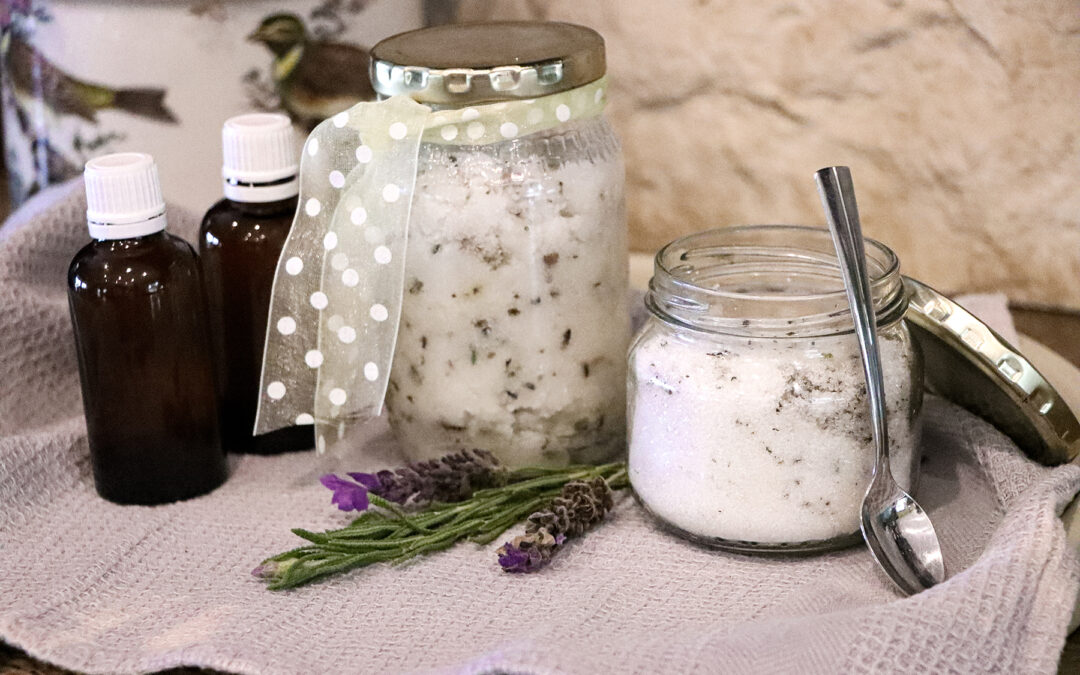
Make you own relaxing and destressing salt scrub for the bath. You can even decorate the jars with a ribbon if giving as a gift.
Lavenderwater
1. Pour 100ml of boiling water over 2 tablespoons of fresh or dried lavender flowers into a bowl lined with muslin cloth.
2. Cover the bowl and leave to cool at room temperature.
3. Strain the mixture and pour into a clean glass bottle and store it in the fridge.
Lavender salt scrub
1. In a large bowl add 2 cups of Epsom Salts, ½ cup of coconut oil at room temperature.
2. Add 2 tablespoons of lavender flowers – we used fresh flowers but you can use dried flowers too. Mix well to combine all the ingredients. If you want to add an extra bit of fragrance, add 10-20 drops of lavender oil.
3. Place your salt scrub in jars to seal in the moisture and fragrance.
Something sweet
For something sweet, add lavender flowers to cheesecakes, sorbet and ice cream. You can even infuse sugar with lavender for baking.
Follow the Thanks Plants campaign on www.thanksplantssa.co.za and enter the competition in the August, September and October issues of The Gardener and Die Tuinier.
Gardens are incomplete without at least one lavender plant. These popular perennials add a touch of purple to flower beds, borders, and everywhere in between. They are also incredibly resilient and low-maintenance, perfect for gardeners with little time on their hands for tedious or fussy plants.
However, that doesn’t mean they are without problems. Like any plant, incorrect conditions and care can lead to issues that, if not resolved in time, will lead to the demise of your plant. If your lavender isn’t looking as good as you’d hoped, take a look at these potential causes to fix it at the source.
Wilting
Originating from the Mediterranean, lavender plants are accustomed to dry summers and rainy winters. They are also drought-tolerant, making them ideal for hot South African weather. They prefer their soil on the drier side and don’t often require additional watering, except in regions without winter rainfall.
If your plant is left to sit in waterlogged soil, either due to excessive rainfall, compacted soil or simply overwatering, it will start to show signs of struggle. The new herbaceous growth may droop over and become soft, while foliage on the woody base growth turns brown.
Make sure the planting area is in full sun, away from any areas where water pools. The soil should be loose and well-draining to prevent any moisture from sticking around in the soil for too long. Lavender rarely, if ever, requires additional watering once established as excessive water will only do more harm than good.
No Flowers or Fragrance
If you’ve ever dreamt of summery fields of lavender in the Mediterranean sunshine, you’ll already know these plants are fans of full sun. They need as much bright light as they can get and certainly aren’t suitable for shaded areas.
If your lavender gets less than six hours of direct sunlight every day, it won’t perform as expected. Firstly, you likely won’t see many flowers, or any at all if the shade is severe. The leaves can also start to become duller in color, losing their vigor. Finally, a sign you may not notice straight away is a change in fragrance. Lavenders in low light can also lose their scent slightly – not something potpourri lovers will be happy with.
Always plant in full sun areas – the more sunlight these perennials get, the better. Those with smaller gardens can also plant in containers, allowing you to move the plant to a sunnier spot as needed throughout the seasons.
Leaf Loss
Many regions of South Africa have moderate temperatures. However, gardeners are not strangers to occasional bouts of frost which can completely ruin entire beds if not protected.
Your lavender’s response to cold temperatures will depend on the type. English lavender doesn’t mind temperature dips and frosty evenings, but French and Spanish lavender cannot tolerate the cold as well. Frost damage can cause these types to turn brown and drop all of their foliage, with degree depending on the length of the exposure.
Choose the right type of lavender for your region or protect your plants from the cold with a frost blanket when any signs of temperature dips emerge.
Watering is one of the most frequent care tasks in indoor gardening. Unfortunately, it is also the area where most new houseplant owners go wrong. From overwatering to lack of drainage, there are many common mistakes that can lead to the demise of your plants. Avoid these 5 mistakes to keep your houseplants happy and healthy year-round.
#1: Watering Too Often
Overwatering is one of the greatest houseplant killers. Most plants (and especially houseplants) don’t like to sit in overly moist, soggy soil. This leads to a condition known as root rot, causing the roots to become soft and mushy. Once severe root rot sets in, it is incredibly difficult to save the plant, so this is one of the most vital mistakes to avoid.
Never water when the top layer of soil is still moist. Rather test it with your finger and add water when it begins to dry out, with the amount depending on the specific houseplants you have.
#2: Waiting Till The Plant Is Wilting To Water
On the other end of the watering spectrum, we have underwatering. For those who tend to forget about their houseplants, it’s quite common to wait until the plant is showing signs of struggle before watering again. Wilting and curling leaves are often used as an indicator of when to water. Unfortunately, if the plant has started wilting, it is likely facing water stress and should have been watered several days prior.
Again, testing the soil is the easiest way to avoid this mistake. Make it a habit to check the soil of your houseplants every couple of days to prevent over or underwatering.
#3: Watering Inside A Pot Cover
Pot covers are wonderful decorative additions to indoor gardens. Not only do they elevate your overall design by hiding unsightly plastic pots, but they can also be swapped and changed frequently – perfect for those indecisive designers that always feel the itch to change it up.
However, if you’re using pot covers for your houseplants, it’s vital to never water them inside this cover. Water quickly collects at the bottom and waterlogs the soil. The stagnant water also attracts bacteria that can harm your plants.
Always remove the plant from the pot cover before watering. Only return it to its original home once all the excess water has drained from the drainage holes. Alternatively, water inside the pot cover and pour the excess out after about 10 minutes.
#4: Watering On A Strict Schedule
The conditions around our houseplants change daily. From light levels to temperature and even humidity, there are several factors that can change how quickly the soil dries out week to week.
Watering on a strict schedule – say once per week as an example – ignores these factors, opening your plants up to stress from over or underwatering. Watering times are only a guideline and shouldn’t be followed strictly if you want to consistently water at the right time.
Always keep an eye on the soil and the performance of your plants to determine the best time to water. If you tend to forget, set a reminder to check the soil every few days and only water as needed.
#5: Lack Of Drainage Holes
Finally, the last mistake is using a pot with bad drainage or no drainage holes. When recycling containers, we may feel tempted to use ones without drainage holes to avoid the hassle of creating drainage holes ourselves. Often we find decorative pots that we desperately want to plant in for aesthetic value, ignoring their lack of drainage holes. Unfortunately, no matter how careful you are, this will eventually end up killing your houseplants. To resolve this issue, drill drainage holes into your chosen pot or simply use it as a pot cover, resting a plastic pot inside.
Although mulching can be time-consuming and tedious, it is one of the best things you can do for your garden. Mulch retains moisture in the soil, helping the plants and saving water at the same time. Some mulches are also excellent weed suppressors and make beds look neat and tidy. When choosing organic mulches, you also have the benefit of improving the soil at the same time.
There are many materials you can use as mulch, either recycled from the garden or purchased, and organic or inorganic. Take a look at their pros and cons to determine which is right for you.
Straw or Hay
Straw mulch is a great choice for vegetable gardens. While it can look untidy, it conserves moisture incredibly well, making it perfect for moisture-loving veggies that need plenty of water to produce fruits. It is also great for keeping weeds down and is often very cheap (or completely free if you have a farmer or stable owner willing to share nearby). Hay can also be used for the same purpose, but often contains seeds that can fill your veggie garden with weeds. Straw and hay are organic materials that will break down over time to improve the quality of the soil.
Compost
If you have a consistent supply of compost from your own compost heap, consider using it as a mulch. Compost retains tons of moisture and also contains nutrients and organic materials to improve the soil. Compost keeps the soil cool, especially during the hotter months when high temperatures can cause stress. But, if you’re looking to suppress weeds, compost is not the most effective. It also needs to be kept moist to be effective and so is not ideal for those who often forget to water their plants.
Grass Cuttings
In the spring and summer months when lawn mowing becomes an almost weekly task, you may be looking for ways to use the piles and piles of grass clippings you collect. The same can be said for the raked-up fallen leaves in autumn and winter. While these are great for compost, you can also use dried clippings as a wonderful mulching material. This is completely free and makes use of garden waste, but does come with a few caveats. You shouldn’t use any grass clippings that have been treated to avoid damaging the plants they are used on. And, if placed in a thick layer and allowed to dry out, the grass can form a dense mat that actually repels moisture, having the opposite effect.
Wood Chips
Wood chips are a preferred mulch for those that like to keep their garden uniform and tidy. They look great when spread over beds and conserve moisture well. They are also one of the best options for suppressing weeds, especially when placed in a thick layer. You can find hardwood or softwood wood chips that each serve slightly different purposes. Pine chips (softwood) change the acidity of the soil and are great for use around acid-loving plants like azaleas. Hardwood chips take longer to break down but generally remain neutral while doing so.
Landscape Fabric
If you’re looking for a way to suppress weeds, landscaping fabric is your answer. These materials are designed to keep weeds down while still allowing air to flow through the soil, unlike plastic sheeting. In tough-to-manage areas where weeds are really taking over, this option is your best bet. However, it doesn’t look great in the garden, meaning you’ll need to cover it with something else (like stones) to hide it. They also don’t contribute to overall soil health like other mulching materials and make changing up the plants in your garden incredibly difficult.
Each of these materials is great in its own way. Choose the one that best suits the needs of your garden and your plants.
Hoyas are beloved houseplants that have gained massive popularity in recent years. Their thick, waxy leaves and adorable scented flowers make them unlike any other houseplants around. Plus, there is so much variety within this genus, from different species to the many cultivars, that there is bound to be something for everyone.
Hoya carnosa
The most common Hoya species you’ll come across is H. carnosa, popular for its low maintenance nature and ability to flower prolifically indoors. It is also the species with the most cultivars, hybridized and cultivated for over 100 years. If you come across any Hoya in the houseplant section of your local nursery, it is more than likely H. carnosa ‘Jade’, with thick and waxy elongated leaves. These climbers are often found twisting around a trellis or central support. Compacta is another favorite you may have seen on your social media feeds. The thick leaves are twisted and look wonderful cascading from hanging baskets.
Hoya australis
H. australis is another common Hoya species native to Australia and the South of Asia. When compared to the popular Jade Hoya, it looks quite similar, but has a bit more volume in the leaves. Their shape is slightly more rounded (depending on the cultivar) and is usually deep green, although there are some interesting and rare variegated cultivars on the market. They have been compared to Peperomias due to the similar shape in the leaves and they are equally as easy to care for. During spring and summer, you can look forward to adorable clusters of white flowers with bright pink centres.
Hoya kerrii
This species is unique in that it is often sold as a single leaf rather than an entire plant. That’s because the leaves of this Hoya are almost perfectly heart-shaped and large, filling out smaller pots and making a wonderfully unique Valentine’s Day gift. It is commonly known as the sweetheart vine after these interesting leaves that grow on long vines. The leaves are typically a solid green colour, but there are also variegated types with stripes around the edges of the heart. If you find one in stores or online, make sure to snatch it up quickly as these plants sell out fast.
Hoya bella
This compact species has slightly smaller leaves when compared to the other types. You may find them labeled as the miniature wax plant or, to get technical, H. lanceolata ssp. bella. These leaves are arrow shaped and grow densely along the vines, making the plant look full and abundant. Bella translates to beautiful, aptly describing this wonderful species and its scented blooms. If you’re looking to fill space above your head in your home with dense foliage overflowing from a hanging basket, Hoya bella is the perfect option.
Hoya linearis
H. linearis is unlike any other Hoya on this list. The leaves are narrow, long, and incredibly delicate, creating a stunning indoor feature. They look great in hanging baskets or trailing from bookshelves, producing their interesting flowers when given enough bright light during the flowering season. This type is certainly more understated, taking up less space than other Hoyas. But, that’s what makes it perfect for smaller areas that you’re struggling to fill in kitchens or bathrooms. Or, hang them from the ceiling to turn your living room into a Himalayan indoor jungle.
Our Team is ready to answer any questions or concerns that you may have. Feel free to get in touch!
Office Hours: 8:00am – 16:00pm
If we are not available then email us and we will get back to you as soon as possible. hello@tanyavisser.com