Winter is not typically a gardener’s favourite season. A previously bright and happy garden can start to look run down as some plants lose their leaves and others stop flowering. But it doesn’t have to stay this way. Whether you’re choosing annuals for a quick fix of colour or perennials for a more long-term solution, you don’t have to be deprived of colour over the winter season with these plants.
Aloes
Aloe blooms add a wonderful warmth to an otherwise chilly season.
Aloes are the backbone of South African winter gardens. Their fiery flowers instantly stand out in the winter sunshine and are appreciated by birds and other pollinators when blooms are scarce. These plants need to be established before they can flower prolifically, but they will reward your early efforts with winter colour year after year.
Snapdragons
Snapdragons are available in a wide range of heights, useful in many areas of your garden.
Antirrhinums are the perfect way to add a pop of colour to your beds in winter. With so many colours available, from soft blush and cream to bright pink and purple, you can tailor your choices to any area of your garden. They also make great cut flowers, allowing you to bring their stunning colours indoors too.
Ornamental Kale
Ornamental kale not only adds colour to a winter garden, but also a wonderful ruffled texture.
This is one plant that not only grows in cold winter weather, but thrives in it. Ornamental kale comes in a stunning range of cool colours from purple to cream that intensify when temperatures drop. Their textured leaves add continual interest throughout the winter months, interspersed with other leafy plants or even grown in containers.
Pansies & Violas
Use colours like reds and oranges to match indigenous blooms in the garden and create warmth.
Pansies and violas are go-to annuals for winter colour. They are incredibly easy to grow and complement any bed or pot they are planted in. Choose one colour for a more harmonious look, or combine multiple different colours for a bright and happy display.
Petunias
Petunias are great container plants for large pots or hanging baskets in winter.
If you’re looking for larger winter blooms that will instantly attract attention, look no further than petunias. These classic garden plants have stunning colourful flowers that look great in beds and even better in containers. Choose Grandiflora petunias for the best performance over the winter season in most of South Africa.
Alyssum
Alyssum can be paired with other colourful annuals to finish off beds.
The cute clusters of blooms on the popular Sweet Alyssum are a wonderful addition to any winter garden. White is one of the more popular colours, but there are also other choices for more adventurous winter gardeners. Remaining low and compact, they are ideal ground covers or filler plants for bright winter containers.
While all gardeners love a long trip to the nursery, we don’t always have the time or money to buy the masses of plants our heart’s desire. Luckily, there is one essential gardening skill that eliminates that problem altogether – propagating.
Although it may sound tricky, growing new and healthy plants from scratch is easier than many think, taking only a couple of minutes out of your afternoon. With the right tools and gadgets, the process is made even easier. Invest in these essential tools to grow more plants than you know what to do with.
Clean and Sharp Secateurs
One of the first tools any gardener needs in their arsenal is a high-quality, sharp pair of secateurs. Whether trimming herbaceous houseplant cuttings or hardwood cuttings, or even just pruning plants around the garden, this is one tool on the must-have list.
The Tramontina Bypass Pruner is made of durable materials, including Chrome Vanadium alloy and die-cast aluminum, that ensure they will last for many years of propagating. They do require some upkeep, including regular cleaning and oiling, but they will reward you by making the process of propagation as smooth as possible.
Propagating Mix
As any gardener knows, soil is a vital foundation for growth that has a huge impact on the success of your plants. Newly propagated cuttings require a light and well-draining soil mixture to provide little resistance to root growth while holding enough moisture to encourage root growth.
A combination of perlite, vermiculite and palm peat is perfect for this purpose. While the palm peat retains enough moisture without weighing the mixture down, the perlite and vermiculite improve drainage and aeration to deliver oxygen to the roots.
Mix them together in a ratio of two parts palm peat to one part perlite and one part vermiculite for the ideal propagating mix for a range of plants.
Rooting Hormone
Whether you’re growing softwood or hardwood cuttings, rooting hormone is guaranteed to increase your chances of success. The active ingredient 4-Indole-3lbutyric Acid (IBA) stimulates root growth and speeds up the process of propagating.
There is a specific rooting hormone for each type of cutting:
Make sure you use the right type for your chosen cutting. Simply place some of the powder into a separate container (to avoid contamination of the main container) and dip the end of the cutting into it before planting.
Propagator
Cuttings require certain environmental conditions to grow roots – usually warm and humid. Since no one wants to stand next to their cuttings misting every 5 minutes to increase the humidity until roots develop, there is a handy gadget that does all the work for you – a propagator.
This Garland Small High Dome Propagator is perfect for growing cuttings or sowing seeds. With built-in drainage and a deep container, simply lay your propagating mix inside, pop in the cuttings, and cover with the lid. The hole at the top opens and closes as needed, providing airflow and preventing fungal growth.
With these wonderful gardening goodies, it will be hard to go wrong on your next propagating adventure.
How to videos:
Check out these great videos on how to propagate different plants:
Pilea peperomioides is an incredibly popular houseplant, beloved for its compact growth and interesting leaves that lend it many common names, including UFO plant and Pancake plant. However, it is most commonly known as the Chinese Money Plant after its native region and appearance.
If these indoor plants have become one of your favorites, there is an easy way to get many more of them at no cost – propagation. Pilea peperomioides is incredibly easy to propagate as it produces small offsets that simply need to be replanted whenever they appear.
Follow these easy steps to grow more Chinese Money Plants for free.
Step 1: Check for Offsets
Before you start propagating, you’ll need to determine whether there are any suitable offsets to propagate. This isn’t a difficult task – simply check for any new growth of gathered leaves that looks like a tiny version of the parent plant. They will typically pop up from the soil in spring and summer but they can also grow directly from the stem.
Suitable offsets should be about 5cm in length or larger. This ensures they have received enough nutrients from the main plant to survive on their own without additional support.
Step 2: Prepare the Soil
Pileas have succulent-like leaves that hold plenty of water. They prefer their soil to dry out before the next watering and can’t stand waterlogged soil. The soil mix should therefore be airy and well-draining to prevent rot and deliver oxygen to the roots.
Make your own specialized houseplant soil mix by amending potting soil with perlite and palm peat. The palm peat lightens the mixture and retains moisture while the perlite increases the spaces between soil particles, improving drainage.
Step 3: Expose the Roots
With all preparation done, you’re ready to start propagating. As your offset will more than likely start underneath the soil, you’ll need to expose the connection between it and the main plant for removal.
Gently pull away the top layer of soil, following the bottom of the offsets to where the roots are. This will give you a clear view of where to remove the offset without impacting the rest of the roots. Alternatively, you can check for offsets while repotting and remove them when the soil is completely gone before moving to the new pot.
Step 4: Remove the Offset
Using a knife, remove the offset from the main plant at root level. Make sure your knife is sharpened and cleaned with soap and water to prevent damage and the spread of disease. The cut should be as clean as possible to give your offset the best start at new growth.
Step 5: Replant
Fill a small pot with the pre-made potting mix up to a few centimeters below the rim. This will stop any soil from spilling out when watering. Make a small hole in the centre and bury the base of the offset, ensuring the stems are above the soil line to prevent rotting. Gently firm down around the soil to anchor the offset in place.
Step 6: Water
Once planted, water the soil to remove any large air pockets and encourage root growth. Keep the soil moist but not waterlogged until the roots have established, then limit your watering.
Place the pot in a warm spot with bright indirect light. Once you spot new growth, you’re on your way to a mature, fully-fledged Pilea peperomioides.
Pruning is an essential gardening activity. Whether you have a small balcony garden or acres of rolling lawns, you’ll need to head out into the garden armed with your pruning shears at some point in the year.
When compared to other simpler gardening tasks, pruning can seem quite technical. And depending on the plant, it often is. This leads many gardeners to make a few easily avoidable mistakes that could end up damaging their plants long term. Many plants are incredibly resilient and will bounce back without trouble, but it’s far better to avoid these mistakes and get the process right the first time than deal with a greater issue later on.
The first mistake deals with the tools used. Whether you’re pruning your herbs or a massive hedge, your tools should always be two things – clean and sharp. Gardening tools can harbour bacteria or fungi from prior use that get transferred to your plants during your next pruning session. This is a surefire way to spread disease throughout your garden, so make sure your tools are always clean before you get going.
They should also be well sharpened. When you’re anxious to get out into the garden and spend time with your plants, it’s understandable that the last thing you want to do is spend your time sharpening tools. However, blunt tools only make the task of pruning more difficult. It requires more force from you to finish, especially when it comes to dense shrubs or trees, and it is likely to damage the plant stems or branches at the same time. This prevents healthy regrowth, which is often the goal of pruning in the first place.
With tools sharpened, you should be ready to get pruning, but you need to ensure you don’t do so at the wrong time. Different plants need to be pruned at different times and may require different levels of pruning throughout the year. In spring, a light trim to promote new growth is normally the go-to, while larger cutbacks are done in autumn. Understand the needs of the specific plant you’re dealing with before you get started. Take hydrangeas as an example – some hydrangeas form flower buds at the end of the season to prepare for flowering the following year. If you cut these buds off during an autumn prune, you will have no flowers next year.
When it comes to the level of pruning done, there is always the risk of pruning too much. Pruning essentially creates open wounds on your plants. They have the ability to heal and come back stronger, but this does take quite a bit of energy. If you prune too much while the plant is growing, it can become stressed and go into survival mode – not good for healthy growth. For other plants that can be cut down to the ground without trouble, this is not really a concern, as long as it’s done at the right time.
And finally, we have the mistake of pruning without a clear goal in mind. You should always have an idea of why you’re pruning before you start, to guide you as to when to prune, how much of the plant to prune, and the technique required to get it right. This will prevent you from making avoidable mistakes in the process or taking it that little bit too far and harming the plants you are trying to help. It doesn’t have to be a tedious or difficult process if you understand your intentions.
Indoor plant care can be tricky, depending on which plants you own and how many you have. Between providing the right lighting, watering consistently, and watching temperature fluctuations, there is a lot to consider in keeping your houseplants alive.
However, those aren’t the only required tasks in indoor plant care. There are many other small tasks that will improve the look and growth of your plants over time. Some are mostly for aesthetics, which could be considered ‘manicuring’, while others do have a long-term impact on plant health. Make sure you tackle these tasks this year to give your plants the best start possible in 2022.
Clean The Leaves
Your first manicuring task is cleaning your plant’s leaves. Outdoors, plants receive a thorough cleaning when it rains, and enough wind to knock off any unwanted debris. Indoors, that is not the case. Homes are dusty and full of stagnant air – an environment not conducive to clean, shiny leaves.
As dust settles on your plants, their ‘breathing’ is obstructed. Plus, dusty plants, like dusty homes, are not particularly pleasing to the eye. Give your leaves a gentle wipe with a cloth every month or two after watering and wipe down the pot to remove dirt.
Remove Debris
The second task, only taking about five minutes out of your day, is to remove any dead leaves or debris around the base of the plant. In nature, plants are consistently surrounded by decaying leaves and plant debris. They prefer it, as these organic materials decompose and add nutrients back into the soil. But indoors, it’s not a great look, and can attract pests and diseases.
Every so often, just before the plant’s next watering, remove any decaying leaves that have fallen off the plant and any other materials obstructing the soil. You can also remove dying leaves from the plant before they drop. This will promote growth as the plant doesn’t expend any extra energy trying to keep a dying leaf alive.
Pruning
Committed indoor gardeners with unruly plants can attempt to prune once a year, although this is not usually necessary for most indoor plants as they grow far slower than they would outdoors.
Pruning promotes new growth and keeps the plant to a more manageable size. You are welcome to let your plants go wild and skip pruning altogether, but if you want your plants to be more compact, this is a good step to take. Hanging plants in particular may benefit from an occasional pruning to lower the pressure of the hanging stems on the base of the plant.
Repotting
Many indoor plant parents forget to repot, only considering the task when the plant shows signs of stress. However, your plants will be far happier when placed in their new pots at just the right time.
Due to their slower growth, most indoor plants will only need to be repotted every 2-3 years, or when their soil begins to degrade. Quick-growing plants may outgrow their pots faster than that, but mature established plants won’t mind a longer period between repotting.
This is one task you certainly don’t want to miss. As the roots begin to outgrow the pot, they may stop taking up moisture and essential nutrients. Growth will also slow and can stop completely, ultimately killing the plant. Degraded soil will have detrimental impacts on the health of your plant as it lacks nutrients and cannot hold onto moisture. If that time has come, make sure you don’t put off repotting this year.
You can grow almost anything in containers. With the right size pot and the right conditions, most plants that are typically reserved for garden beds or backyards will thrive (some even more than if they were grown in the garden). There are even varieties of plants bred specifically for growth in containers.
But, while you have almost unlimited choices in what you can grow, your garden conditions will still limit which plants will grow well. These are a few things to consider in picking your ideal container plants.
Climate
Local temperatures dictate which plants you can grow and how well they will grow. To assess the climate in your region, you need to understand the climate type. In South Africa, we have a wide variety of climate types, from lush subtropical to arid desert and almost everything in between. If your containers are going to be placed outside without protection, you need to ensure the plants chosen are suitable for your climate first.
Light
Where indoor gardeners use terms like ‘bright light’ or ‘low light’, outdoor plants are distinguished by the terms full-sun, partial sun, and shade. Full-sun plants need over six hours of sunlight per day (some need more), partial sun between three and six, and shade plants under three hours. Other descriptors you may see are morning or afternoon sun, which speak for themselves. You will need to limit your choices to a certain range of plants whose light requirements match your outdoor conditions.
Other Considerations
Other conditions like humidity and wind can influence a plant’s growth but can also be managed to meet the plant’s needs. Humidity can be altered with the same practices used indoors – grouping plants or placing them on a tray. Wind, which damages weaker plants, can be blocked with screens or shields.
The two conditions you are unable to control are climate and light, so start there. When you purchase a plant from the nursery, it should indicate the plant’s conditions on the label, but you can also ask someone for help to find the perfect plant for your conditions.
Companion Planting
When choosing plants that will share a pot, consider plants with similar conditions that are known to grow well together. When combining plants in the same pot, they are sharing light, space, and most importantly – soil. Any maintenance you do will apply to all plants simultaneously.
Before grouping plants together, ensure their desired conditions are matched, so one plant does not survive at the expense of the other. For example, when planting a herb container, thyme and rosemary will grow well together as they have similar needs, but sage will die because it has different water requirements. Similarly, mint tends to dominate any pot and is best planted alone.
Time
After considering the plants, don’t forget to consider yourself. You, as the gardener, will be committing time to care for whatever plants you choose and some are more demanding than others. Like any good relationship, you should understand the level of commitment required before jumping in. Plants in containers need to be watered more often, checked for pests regularly, and need more plant-specific care than those left to their own devices outdoors. Decide how much time you want to spend on plant care and which difficult plants you are willing to deal with before you buy.
While making your choices, don’t forget that they are not set in stone. Container gardens, unlike established backyards, are made to be tweaked, changed, and played with until you settle on what feels right. In fact, you don’t have to settle on anything at all. Container gardens embody variety, change, and experimentation. Embrace those factors, learn along the way, and you will master choosing the right plants and container gardening in no time.
Sunflowers are guaranteed to brighten up any backyard. Their bright yellow blooms are irresistible, inducing smiles in anyone that sees them. You don’t need to drive past a sunflower field to appreciate their beauty either. It’s easy to grow your own in your garden, giving you gorgeous giant flowers year after year.
Planting
Evident in their name, sunflowers (Helianthus) need plenty of sunlight to grow well. A minimum of 6 hours is necessary, but around 8 hours of unfiltered direct light is ideal. Before planting, amend your soil with compost and a dose of slow-release fertilizer like Atlantic Bio-Ocean – sunflowers are considered heavy feeders.
You may be surprised to find how large these plants actually grow (or, if the blooms are anything to go by, you’ve likely already guessed). The long taproot burrows deep in the soil to support the massive stems. When planting, loosen the soil quite far down to facilitate this growth. When growing in containers, choose a smaller sunflower variety and ensure the pot is deep enough to accommodate root growth.
Seeds can be planted throughout spring and summer once the soil is warm enough to trigger germination. Space seeds around 15cm apart and push gently into the soil. Smaller sunflowers can be spaced closer together, while incredibly tall ones will need a bit more growing room. Water thoroughly immediately after planting to stimulate growth.
To stop your plants flowering at the same time – leaving you with a pile of sunflowers and no clue what to do with them all – plant a batch of seeds every 2 weeks for about 2 months for continuous flowers. Flowers should shoot up within 2 months of planting.
The seeds should germinate in 7-10 days. Keep an eye out for pesky birds in the meantime that love snacking on sunflower seeds just as much as we do.
Care
Sunflowers are not fussy plants, but will reward you with many more impressive blooms under the right care.
Due to their height, sunflowers will benefit from staking, especially in windy regions. Place stakes early to avoid disturbing the roots later on, and continue to tie the stem to the stake with a flexible material as it grows to stop the plant from falling over.
These plants grow best when given consistent water, though they prefer when the soil does not stay moist for too long. Once the top layer of soil has dried out completely, it’s time to water again. If the heads and stems and falling over, they’re telling you they need more water.
The slow-release fertilizer applied during planting should be enough to sustain your sunflowers. If you’re not seeing many blooms, apply a dose of fertilizer high in phosphorus and potassium to improve flowering.
You won’t encounter too many issues with pests and diseases when growing sunflowers, bar the light sprinkling of powdery mildew that is easily removed. Where you will have a problem however, is with the birds in your garden.
Birds are wonderful garden friends, and gardeners usually go by the mantra ‘the more the merrier’. However, they are sunflower-obsessed and will do anything to get to your sunflower seeds. Adopt a quick cut-flower approach by removing blooms as soon as they are ready, or install a protective barrier around your sunflower patch.
Sunflowers provide you with two benefits – stunning flowers and tasty seeds. Cut blooms in the early morning before the heat of the day sets in. They will need a tall vase and plenty of water to keep them standing upright. To harvest the seeds, leave the flowers on the stems until the petals have died back. Once the heads have turned brown, the seeds should be easy to shake off. Give them a rinse and eat them as a snack or toss a few into your favourite salad.
Spring and summer are the seasons to truly appreciate the flowers in your garden. Of course, they look beautiful and attract plenty of garden friends that help the environment too. But there is one character they provide that may be overlooked in favour of their beauty – scent.
So many flowers release intoxicating scents that upgrade the experience in your garden dramatically. These scents are the inspiration for the thousands of perfumes and sprays we cover our bodies and homes in, so what could be better than the real thing? Ensure you have at least one of these six plants in your garden for the ultimate sensory feature.
Roses
A classic flower that has spawned millions of devoted followers and several societies dedicated to their appreciation and preservation, the rose is a must-have in any scented garden. If they weren’t, the phrase ‘stop and smell the roses’ wouldn’t be a cliché. When planted en masse, roses fill the air with a sweet scent unlike any other flower. When planting one, you may have to get up close and personal to appreciate the fragrance, but it will certainly be just as special.
Lavender
Another classic floral scent, and a great companion for roses, is the humble lavender. Very few gardeners can resist this bushy plant covered in hundreds of small purple flowers that not only look fantastic, but smell great too. Walk past a lavender bush and you can’t help crush a few leaves between your fingers or pull the flowers up to your nose. Few need more convincing than that, but they do come with the added benefit of holding their scent when dried, making them ideal candidates for potpourri.
Gardenia
Take a look at the descriptions in any perfume store and you are bound to see gardenia more than a few times. This popular scent is captivating, and the flowers have a remarkable ability to permeate the air in your garden. Depending on which gardenias you choose, your garden could be filled with their fragrance from spring all the way into autumn. Alternatively, cut them off their stalks and bring them indoors to fill your home with their scent from a decorative cut flower vase.
Sweet Alyssum
A fragrant plant that doesn’t get as much attention as it deserves is sweet alyssum. It’s prized for its ability to fill containers, cascade over the sides of hanging baskets, or act as a ground cover, making it the perfect companion plant. It is less well known for its stunning scent that is – as the name describes – incredibly sweet. Sweet could also describe the small blooms that grace our gardens twice a year in spring and again in autumn.
Jasmine
Those who favour more tropical scents over the delicate, creamy ones mentioned before will appreciate jasmine. This climber will cover fences, archways, and trellises to sport bright white flowers in late spring and into summer. The scent is so strong, due to the hundreds of flowers and vigorous growth of this plant, that it is bound to become your garden’s signature scent.
Magnolia
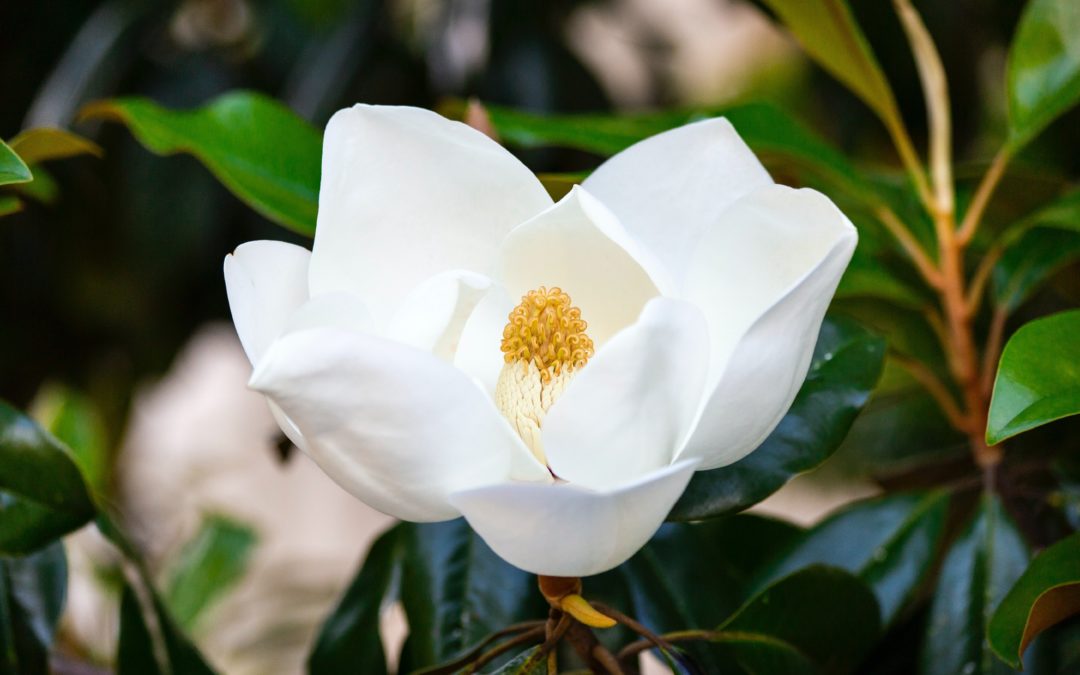
This list would be incomplete without at least one tree, and from the many to choose from, we have to opt for magnolias. Magnolias are truly magnificent, from the size of the flowers to the shade of the foliage. But where it really stands out is in scent. A mix of tropical, sweet and floral, towering magnolia trees make a sensory statement wherever they are planted.
If your garden has seemed different in recent years, with that familiar buzz much quieter, the air less colourful and alive, it’s probably not your imagination. Bee and butterfly populations face alarming declines worldwide. That’s a scary thought, considering that most of the crops we eat rely on these (formerly) frequent visitors.
It’s true that no one person can single-handedly restore the monarch butterfly and reverse the honeybees’ downward spiral, but as we work on the larger issues at play, like climate change and widespread pesticide use, pollinators need safe spaces to feed and find mates. That’s where you come in: make your own yard a pollinator-friendly pit stop with a few simple fixes.
Why are bees so important?
Bees are such a precious part of our ecosystem, and there has been some concern about their well-being over the last few years. It is thought that certain pesticides as well as mass monoculture farming are playing a key role in weakening their immune systems, causing colony collapse, and declining numbers. Loss of habitat and urbanisation are also taking their toll. This problem is far more severe in the industrialised northern hemisphere but is starting to gain ground in South Africa too.
By making your garden a biodiverse haven, you can play your part in keeping the bees thriving as an indispensable part of our ecosystem.
Pesticides
It’s important to make sure that you are not using nasty pesticides in your garden that are known to contain bee-harming chemicals such as neonicotinoids. Read your labels – they usually contain acetamiprid, clothianidin, imidacloprid, and/or thiamethoxam as active ingredients. Explore greener, healthier pest control options.
Plants that bees love
The most important step you can take is to plant a pollinator-friendly garden. Choose nectar- and pollen-rich plants such as vygies, rosemary, sunflowers, thyme, lavender,agapanthus and fruit trees.
Some more bee-loving tips
Bees are especially attracted to purple, violet, blue, blue-green, yellow, ultraviolet, and white flowers, and they prefer scented flowers.
Plant flowers that bloom at different times of the year to keep the bees well fed year-round.
A bee bath needs to be shallower than a bird bath – a shallow tray-like bath of water is ideal. You can also put some marbles in a shallow pan and fill it with water – that way the bees will have somewhere to land and drink.
Care for our Butterflies
If you want the privilege of these floating jewels in your garden, you’ll need to make peace with a few munching caterpillars, because that’s how butterflies start off. To encourage butterflies in your garden means you must allow for the larval stage too – your garden should serve as a sanctuary to nurture and protect the butterfly throughout the stages of its life.
Pesticides
Go lightly on pesticides and only use them when necessary, to give caterpillars a fighting chance as they are already pitted against plenty of natural predators. especially if you are creating a diverse ecosystem in your garden. Toxic pesticides can also get into the plant nectar that adult butterflies drink.
Plants that butterflies love
Our top picks to include in your garden to attract butterflies are Cape plumbago, Cape honeysuckle, butterfly bush, lavender, daisies and impatiens.
Some more butterfly-loving tips
When it comes to flowers, butterflies like colours ranging from blue to mauve, red, pink or white.
Some butterflies like rotting fruit such as bananas or pineapple, so leave some fruit from your fruit trees to rot on the ground as food.
They like to get some minerals from pockets of mud too, so a little mud puddle or two will be appreciated.
Bringing insects back into our garden
Let’s aim to bring back all the beneficial insects back into our garden and appreciate them for all pollinating services they provide. They buzzing of the bees and the colourfulness of butterflies definitely puts a smile on our faces.
Our Team is ready to answer any questions or concerns that you may have. Feel free to get in touch!
Office Hours: 8:00am – 16:00pm
If we are not available then email us and we will get back to you as soon as possible. hello@tanyavisser.com